
What if the shed that looks like a head start turns out to need more work than a new coop? It’s a reasonable concern. Problems with shed to coop conversions can hide behind sound-looking walls, from weak flooring and gaps predators can exploit to poor airflow that traps heat and moisture.
An existing shed may still be a good fit, especially when its structure is solid and its shortcomings can be corrected. But in Texas, ventilation, shade, and drainage deserve close attention. Before investing time or materials, identify which warning signs are manageable and which suggest the building isn’t suited to your flock.
This guide explains what to inspect first, including the structure, airflow, materials, and likely predator entry points, then helps you weigh the work against another housing option. If a shed needs extensive adaptation, a handcrafted, completed coop from our McGregor, Texas, workshop may be a more practical path for your flock and prepared site.
Key Takeaways
- Look beyond a shed’s appearance: water intrusion, rot, damaged flooring, or unstable framing may signal bigger concerns.
- Assess airflow, shade, drainage, and predator entry points with Texas weather and your flock’s needs in mind.
- Some problems with shed to coop conversions can be addressed, but suspected hazards, unstable framing, and recurring leaks are reasons to stop and reconsider.
- Compare the shed’s condition and required modifications with the effort of choosing a purpose-built coop before committing.
- If extensive adaptation isn’t practical, a handcrafted, completed coop can offer another path for your flock and prepared site.
Problems with Shed-to-Coop Conversions Often Start with the Shed Itself
Reusing a shed can feel like a sensible head start: the walls and roof are already there, and the building may have served your property well for years. But a shed was built for its original purpose, not necessarily for the daily needs of a flock. A dry-looking exterior can hide trouble underneath, while a sturdy structure may still be awkward to clean or enter. Problems with shed to coop conversions often start when people judge the building by appearance rather than how it will work day to day.
A suitable coop candidate is a structurally sound, dry, accessible shed that can be adapted safely. Consider the whole picture before planning changes: condition, usable floor area, flock size, human access, and the space needed for routine cleaning all affect whether reuse makes sense.
Structural damage, moisture, and uncertain materials
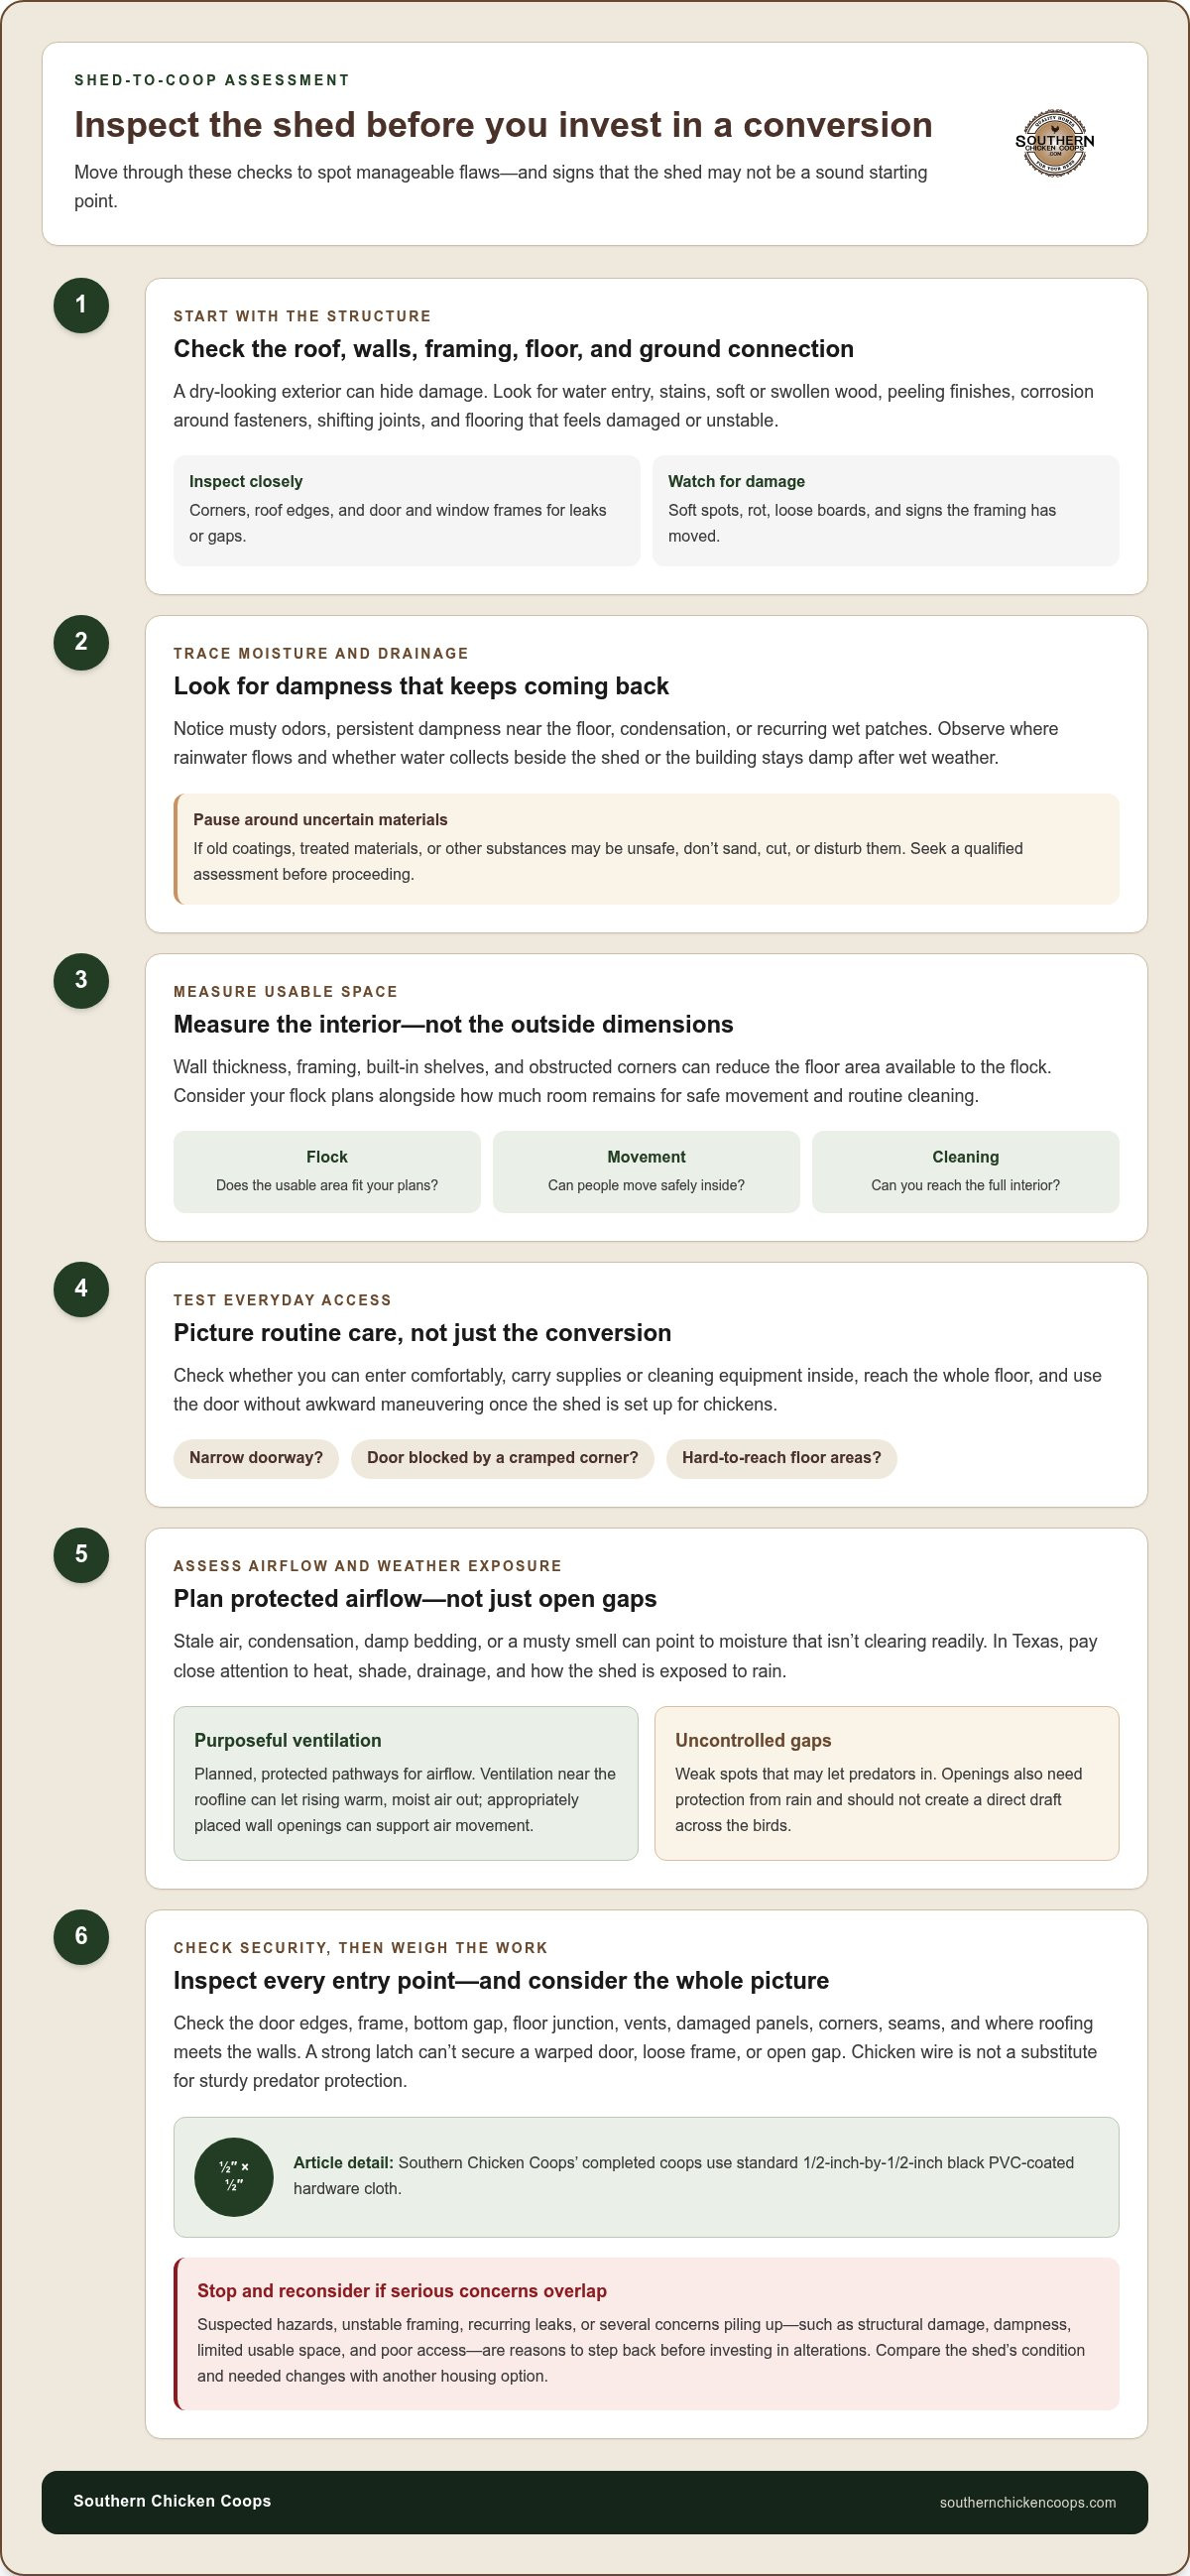
Inspect the roof, walls, framing, floor, and the areas where the shed meets the ground. Look for evidence of water entry or lingering moisture, including stains, soft or swollen wood, peeling finishes, corrosion around fasteners, and flooring that feels damaged or unstable underfoot. Gaps and shifting joints can signal deterioration as well as potential entry points that will need attention.
- Check corners, roof edges, and door and window frames for leaks or gaps.
- Look for soft spots, rot, loose boards, and signs that the framing has moved.
- Notice persistent dampness or musty odors, especially near the floor.
- Inspect the floor for damage that could make cleaning difficult or leave an unsafe surface.
A site that repeatedly collects water can make the coop harder to keep clean and usable, even if the building seems repairable. Observe where rainwater flows and whether the shed stays damp after wet weather. If you find old coatings, treated materials, or other substances whose safety is uncertain, pause work around them. Don’t sand, cut, or disturb suspect materials; seek a qualified assessment before proceeding.
Space, doors, and everyday access
Measure the interior space you can actually use, not the shed’s outside dimensions. Wall thickness, framing, built-in shelves, and obstructed corners can reduce the area available for the flock. Consider your flock plans alongside the layout. Usable floor area is only part of the calculation: people need room to enter, move safely, reach areas that require cleaning, and carry out routine care without awkward maneuvering.
Pay close attention to access. A narrow doorway may make carrying supplies or cleaning equipment inside a chore. A door that opens into a cramped corner can block movement, and an awkward layout may leave parts of the floor hard to reach. Picture ordinary tasks, not just the initial conversion: Can you enter comfortably? Can you reach the full interior? Will the door remain easy to use when the shed is set up for chickens?
One manageable flaw is different from several costly or safety-related concerns piling up together. If structural damage, recurring dampness, limited usable space, and poor access overlap, step back before investing in alterations. A careful first assessment helps you decide whether the shed is a sound foundation or another housing option is more practical.
Ventilation, Texas Weather, and Predator Entry Create Hidden Conversion Problems
A shed can look dry and secure while still holding heat and damp air inside. Poorly planned airflow leaves moisture from the flock and bedding with few places to go, while Texas heat can make a closed-up interior uncomfortable. Ventilation, weather exposure, and security are connected: adding openings may improve air movement, but each one also needs protection from rain and unwanted entry.
Poor airflow and moisture in an enclosed shed
During inspection, notice whether the air feels stale, condensation appears on interior surfaces, or the building and bedding stay damp. A musty smell or recurring wet patches can point to moisture that isn’t clearing readily. Consider these signs together: dampness may linger in a poorly ventilated building, while leaks or wind-driven rain create a separate problem to solve.
Think about airflow as a planned route through the structure, not simply a matter of leaving a door open. Ventilation near the roofline can give rising warm, moist air a way out, while appropriately placed wall openings can support air movement through the space. Consider the shed’s layout, exposure, and how openings can be screened and protected from rain. A window or vent that creates a direct draft across the birds is not the same as controlled air exchange.
Purposeful ventilation openings are planned, protected pathways for airflow; uncontrolled gaps are weak spots that can let predators in. Keep that distinction in mind before cutting into walls or roof edges. Every new opening needs a clear ventilation purpose and a secure finish that doesn’t create an easy route inside.
Weak doors, gaps, and exposed sites
Check more than the latch. Examine the door’s edges, frame, bottom gap, and floor junction, along with vents, damaged panels, and places where roofing meets the walls. A strong latch can’t secure a warped door, loose frame, or open gap. Look closely at corners and seams where patchwork repairs may have left openings. Chicken wire is not a substitute for sturdy predator protection. Southern Chicken Coops’ completed coops use standard 1/2-inch-by-1/2-inch black PVC-coated hardware cloth.
Then assess the site around the shed. Does the ground stay level, or does water collect beside the walls after rain? Is there useful shade, or does the building sit exposed to direct sun through the hottest part of the day? Check where runoff travels and whether the shed’s threshold or floor could take on water. A location that repeatedly holds standing water may keep the structure damp and make the interior harder to maintain.
These issues can compound: a sun-exposed shed with limited airflow may trap heat, while poor drainage keeps the floor and bedding damp. If the conversion calls for major ventilation changes, extensive gap repairs, and site correction at once, compare that work with another housing option. A handcrafted, completed chicken coop may be a practical alternative when adapting the shed would take more than expected.
Shed Conversion vs. Purpose-Built Coop: Compare the Work Before Committing
An existing shed can be a useful starting point, but its roof and walls are only part of the decision. Compare what’s already sound with what must change before the space can serve your flock safely and comfortably. The problems with shed to coop conversions often become clearer when you account for the full project, including repairs, new features, and the daily tasks the finished setup needs to support.
Use this comparison to organize your assessment. It doesn’t promise that one path will cost less: the work and expense of either choice depend on the shed’s condition, the materials needed, and the changes required.
| Consideration | Shed conversion | Purpose-built coop |
|---|---|---|
| Existing structure | Begins with the shed’s current condition, layout, and site. | Starts with a completed structure intended for chicken housing. |
| Required modifications | May need repairs, ventilation, secure openings, and interior changes. | Reduces the need to adapt a building designed for another use. |
| Project effort | Depends on how much repair and alteration the shed needs. | Involves choosing a suitable completed coop and preparing its site. |
| Day-to-day usability | Depends on whether the layout supports access, care, and cleaning. | Can be selected with flock needs and routine use in mind. |
When adapting an existing shed may make sense
Reuse may be practical if the structure is sound, the floor plan works, and the necessary changes are manageable. The key is whether you can create secure access, adequate airflow, and a layout that makes routine care and cleaning straightforward. Consider the order of work, too: repairing a sound opening is different from rebuilding deteriorated framing before you can begin the conversion itself.
Age alone doesn’t decide suitability. An older shed in good condition may be a better candidate than a newer one with persistent moisture or a frustrating layout. For broader site-planning context, use this Texas chicken coop preparation guide as you consider where the housing will sit and how the site supports your plans.
When another coop option may be more practical
Pause and reassess if the shed needs extensive structural repairs, stays damp despite efforts to keep it dry, or is difficult to enter and clean. Several shortcomings together can turn an apparent head start into a repair-heavy project. Rather than judging each fix in isolation, list the work needed to make the whole space suitable, then consider the time, materials, and effort involved.
A completed coop is another practical path when adapting the shed no longer fits your plans. Southern Chicken Coops handcrafts completed coops in McGregor, Texas, and delivers them to a prepared, level lot. The right choice depends on your flock, the shed’s condition, and the site you have available. Comparing these factors before work begins can help you put your effort toward a secure, usable home.
How to Assess a Shed Before Converting It into a Chicken Coop
A steady inspection gives you more than a list of repairs. It helps you decide whether the shed is a reasonable foundation, needs a few manageable changes, or should be ruled out before you invest in conversion work. You can document what you see, but suspected structural damage or hazardous materials call for qualified assessment, not guesswork.
A practical inspection sequence for the existing shed
Work through these steps in order, recording observations before planning poultry-specific additions. The goal is to understand the shed as a whole and how it will function on your Texas site.
- Document the condition. Photograph visible leaks, stains, soft areas, gaps, corrosion, damaged flooring, and doors that don’t close properly. Note where each issue appears and whether it seems to be getting worse. If framing looks unstable or you suspect hazardous materials, stop and seek a qualified assessment before disturbing the structure.
- Measure usable interior space. Record the dimensions inside the shed, accounting for obstructions and areas you can’t reasonably use. Compare the space with your flock plans, and leave room for human entry, cleaning, and regular care.
- Assess airflow. Notice whether the interior feels stale, shows condensation, or stays damp. Identify where ventilation could be planned without leaving openings exposed to rain or creating uncontrolled entry gaps. If the necessary changes involve uncertain structural work, record that as a concern rather than assuming it’s a simple fix.
- Inspect access. Check whether the doorway and interior layout allow comfortable entry and practical cleaning. Note narrow openings, awkward turns, or areas you can’t reach easily. Think through routine use, not just whether you can get inside once.
- Review the site. Record shade, slope, drainage, and any standing water around the building. Look for places runoff collects near the walls or threshold, and consider whether the site stays damp after rain. Compare the shed’s location with other chicken coop options in Texas as you assess the site.
Turn inspection findings into a go, repair, or stop decision
Sort your notes into three groups: manageable changes, major uncertainties, and stop-and-reconsider issues. A small gap or an access improvement may be manageable. Unstable framing, suspected hazardous materials, or recurring water intrusion are reasons to pause conversion plans until the underlying concern has been assessed or resolved. Don’t start adding roosts or other coop features while the building’s safety and condition remain uncertain.
Then weigh the shed’s usable layout against your flock and regular care needs. If you can’t make the space secure, ventilated, and practical to clean without extensive work, a completed coop may better fit your plans. For a handcrafted option delivered to a prepared, level lot, explore custom chicken coops as you decide on the right setup. A careful assessment can help keep problems with shed to coop conversions from becoming costly surprises.
When a Shed Is the Wrong Starting Point, Choose a Ready-to-Use Coop
A shed that doesn’t pass inspection doesn’t have to put your flock plans on hold. It simply means the housing decision may need to change. If repairs, moisture concerns, awkward access, or other problems with shed to coop conversions make adaptation impractical, a completed coop offers another path without asking you to keep investing in a structure that isn’t a sound fit.
Southern Chicken Coops handcrafts completed chicken coops in McGregor, Texas, and delivers them to the customer’s prepared, level lot. That gives you a different starting point: instead of reshaping a shed around the flock, you can consider a coop alongside your flock’s needs and your property’s conditions.
What a completed coop can resolve
Some features can address concerns that commonly arise during a shed assessment. Southern Chicken Coops’ standard predator mesh is 1/2-inch-by-1/2-inch black PVC-coated hardware cloth, and the standard roof is silver/galvalume metal roofing. The walk-in chicken run has an interior height of 7 feet 6 inches, a useful detail to consider when comparing everyday access and use.
These specifications are useful points of comparison, not a promise that any coop eliminates every risk. Predator protection still depends on the whole setup, including the site and how openings and access points are managed. Weather exposure, drainage, shade, and flock care remain part of keeping the housing suitable. A well-chosen structure is one part of a thoughtful setup, not a substitute for attention to the property around it.
If a completed coop better fits your plans, explore our handcrafted chicken coops as an alternative to extensive shed adaptation.
Prepare the site and choose a suitable next step
Before arranging delivery, make sure the intended location is a prepared, level lot. Consider where the coop will sit in relation to drainage, shade, and the parts of the yard you’ll use for regular flock care. Site readiness matters: a completed structure still needs a suitable place on your property.
Use the handcrafted chicken coop delivery guide to think through the location and preparation involved before delivery.
There’s no single housing choice that fits every flock or property. Compare the shed’s condition and the work it needs with a completed coop’s features, delivery requirements, and fit for your site. Then choose the option that supports your flock and makes daily care practical and manageable.
Choose a Coop Plan That Fits the Life You’re Building
Your next step doesn’t have to be a commitment to a particular building. Use what you’ve learned to make a clear decision: whether the shed can be adapted safely, what work it would take, and whether that effort fits your flock plans. Walking away from a shed that isn’t suitable isn’t giving up on keeping chickens. It’s choosing not to build your flock’s home on an uncertain foundation.
As you consider your options, picture an ordinary day: entering the coop, tending the birds, and keeping their space in good order. A setup that works with your property and routine is more valuable than one that only looks like a shortcut at the start. Taking time to assess problems with shed to coop conversions can help you choose carefully rather than letting the existing structure make the decision for you.
If a completed coop feels like a better fit, explore Southern Chicken Coops’ handcrafted coops. A thoughtful plan can bring you closer to a secure, welcoming home for your flock.
Frequently Asked Questions
Can any shed be converted into a chicken coop?
No. Problems with shed to coop conversions can begin when the building’s condition, layout, or materials make safe adaptation impractical. For example, a shed with a sound frame but a low, cramped interior may still be a poor fit for the way you’ll care for your flock. Assess the structure and intended daily use first, and pause if you find unstable framing, recurring leaks, or materials that need professional assessment.
Is a metal shed suitable for keeping chickens in Texas?
It may be, but the material alone doesn’t establish suitability. A metal shed in full Texas sun may heat up quickly, especially if it has little shade or poorly planned airflow. Visit the shed during the warmest part of the day and check how hot the interior feels, whether air moves through it, and whether condensation appears. Also inspect sharp edges, loose panels, and openings that could admit rain or predators.
How can I tell whether an old shed has materials that need professional assessment?
You may not be able to identify a hazardous material by sight alone. Treat unknown old coatings, peeling paint, suspect insulation, or materials with an unclear history cautiously, especially before sanding, cutting, or removing them. Photograph what you see and note where it is, but don’t disturb it to investigate. A qualified professional can assess the material and advise on safe next steps before conversion work begins.
What happens if a converted shed gets too hot or damp?
Excess heat can put chickens under serious stress. Watch for open-mouth panting, wings held away from the body, or unusual weakness, and act promptly to move birds to a cooler, safer space if needed. Persistent dampness can leave bedding wet and contribute to stale, unhealthy air. Don’t treat repeated heat or moisture as a minor inconvenience; reassess the building’s airflow, water exposure, and suitability for housing your flock.
Can I keep chickens in a shed without an attached run?
Yes, a run doesn’t have to share a wall with the shed, but plan how the flock will reach a secure outdoor area and return safely. A separate run should be enclosed against local predators, with the route between it and the coop designed so birds can use it reliably. If you intend to keep chickens inside the shed without outdoor access, consider how you’ll provide room for movement and maintain a healthy daily routine.
How much space should I allow for each chicken in a converted shed?
Plan the sleeping area separately from the outdoor run. Southern Chicken Coops’ published guidance calls for 10 inches of roost space per hen and, for chickens that aren’t free-ranged, 8 square feet of run space per bird. That run figure isn’t a recommendation for indoor floor area. Check the usable dimensions of both areas against your flock plans, and make sure the layout leaves room for routine care.
Do I need to anchor a shed before using it as a chicken coop?
Possibly. The right anchoring approach depends on the shed’s construction, base, condition, and exposure to wind at your property. Don’t assume a heavy shed or a level-looking site is secure enough. Review the shed maker’s installation guidance if available, and seek qualified advice if the structure shifts, sits on an uncertain foundation, or is exposed to strong winds. Avoid adding anchors to framing that may already be unstable.
Is a completed chicken coop a better choice than converting a shed?
It can be a better fit if the shed needs extensive repairs, can’t support a practical layout, or would take substantial work to adapt. A sound shed with manageable changes may still suit your plans. Compare the work required with the needs of your flock and property, rather than assuming either option is always easier or less costly. Southern Chicken Coops offers handcrafted, completed coops for Texas flock owners.


