

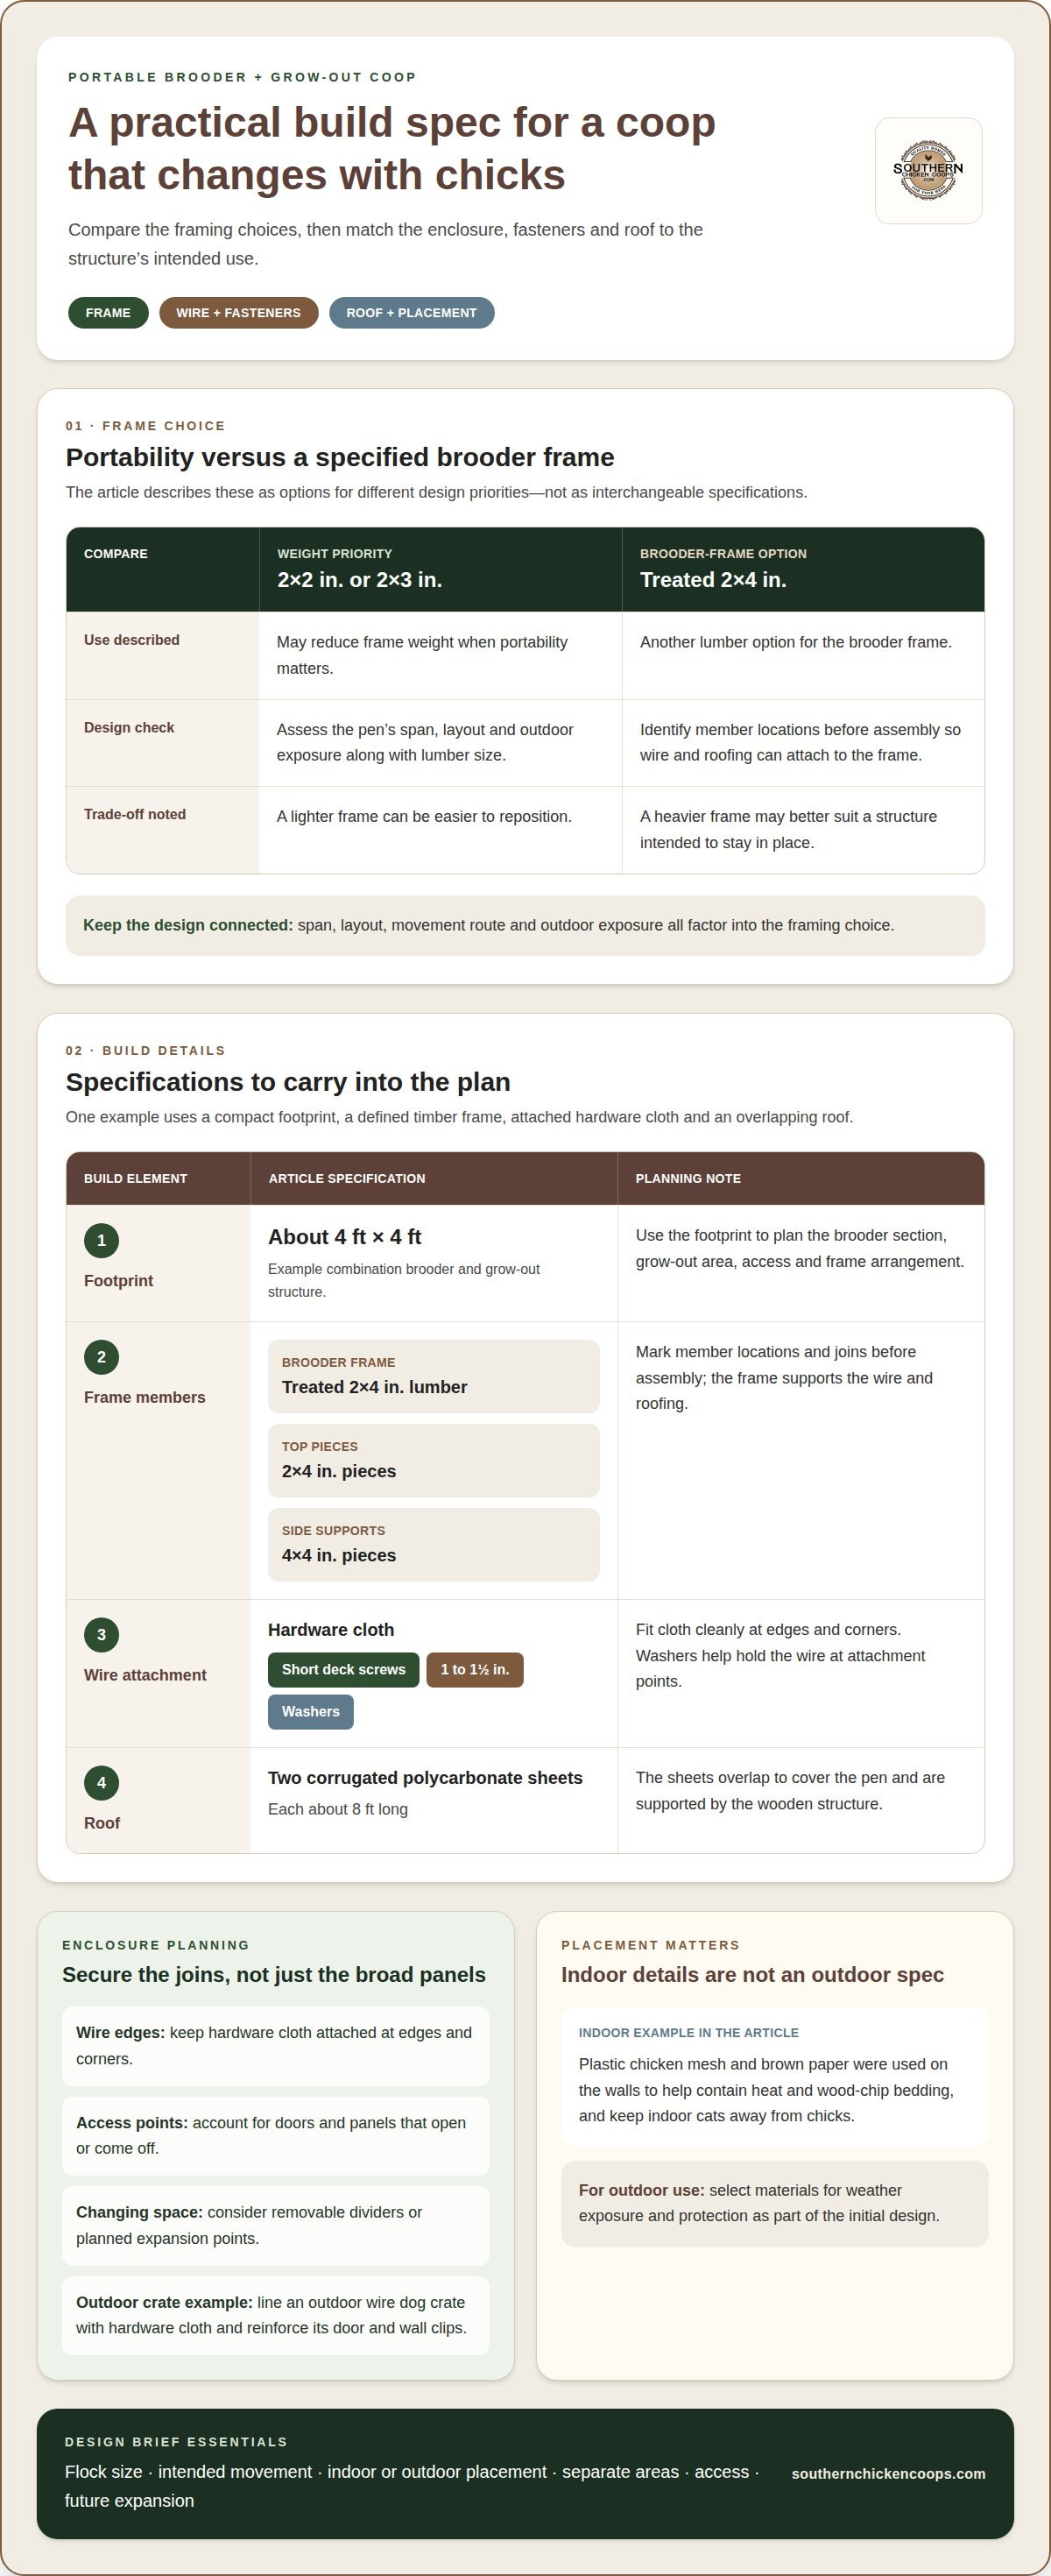
A lighter frame isn't always the right frame for an outdoor pen. For a portable brooder and grow-out pen combination coop, 2×2-inch or 2×3-inch lumber can reduce weight, while treated 2×4-inch lumber is another option for the brooder frame; short deck screws measuring 1 to 1½ inches, used with washers, can secure hardware cloth.
Choosing materials for a brooder and grow-out pen combination coop means balancing portability with the strength and durability needed outdoors. Specify the frame, fasteners, and wire attachments, then plan how the structure will serve first as a brooder and later as a grow-out pen. A clear design brief helps match the coop to its setting and the chicks’ changing needs.
Key Takeaways
- Plan the pen around how it will move and how its brooder and grow-out spaces will be used, so portability doesn’t come at the expense of sturdy construction.
- Specify a layout that gives chicks room to grow and makes the shift from brooding to grow-out straightforward.
- Make outdoor readiness part of the design, including secure wire coverage and protection against digging predators.
- Move chicks outdoors gradually, considering their feathering, the weather, and whether supplemental heat is needed.
- A clear project brief helps a coop builder shape a durable structure around your flock’s needs and intended setting.
How professionals design portable and repurposable pen construction
Portability begins with a frame light enough to move, yet sturdy enough to hold its shape. For a brooder and grow-out pen combination coop, professionals may specify 2×2-inch or 2×3-inch lumber when reducing weight is a priority. The choice depends on the pen’s span, layout, and exposure to outdoor conditions. A lighter frame can be easier to reposition, while a heavier frame may better suit a structure intended to stay in place.
Designers consider more than lumber size. They plan how the brooder and grow-out areas will work as chicks develop, and how a person can reach each space for daily care. A removable divider, for example, can let one enclosed footprint serve separate groups at first and open into a larger area later. The doorway, access panels, and frame joints all need to support that change without leaving gaps or making routine handling awkward.
Repurposing matters when the flock grows faster than expected. One example involved a flock that reached 9 chicks, leading to the addition of a second bin. Another setup used baby play-yard panels on a tarp to create more room after the brooder became crowded after a month. These examples show why a professional design considers where an expansion could connect and how temporary boundaries might relate to the permanent pen.
Match the enclosure material to chick size and predator exposure. An outdoor wire dog crate can be lined with hardware cloth, with its door and wall clips reinforced. The lining helps keep smaller chicks from escaping through wider openings, while reinforced closures strengthen vulnerable connections. In a permanent design, pay the same attention to seams, doors, corners, and joins between movable sections and the main frame.
Choose fasteners to suit the materials they connect and the pen’s setting. Account for hardware-cloth edges, access doors, and panels that may open or come off during a changeover. Secure attachments help keep wire from pulling loose and prevent sharp or exposed edges inside the chicks’ space. These details make the structure safer to handle and easier to adapt.
Before construction, turn your goals into a clear layout: flock size, intended movement, indoor or outdoor placement, and whether chicks need separate areas. Bird numbers affect usable floor space and access points; the route between locations affects frame weight and balance. These decisions guide material selection and show where the structure needs reinforcement.
- For frequent moves: Consider 2×2-inch or 2×3-inch framing, with layout and spans assessed together.
- For changing space needs: Plan dividers or expansion points that support a larger enclosure later.
- For wire enclosures: Specify hardware cloth and secure attachment points around doors and panel joins.
A portable pen is more than a lightweight box. It is a connected system of frame, wire, access, and adaptable space. When each part suits the chicks’ current needs and the structure’s next use, the coop can serve more than one growth stage without compromising secure construction.
Thoughtful design helps divide the enclosure and keep the transition between stages practical. For an outdoor wire dog crate, the protective details should remain part of the design rather than an afterthought: line it with hardware cloth, and reinforce its door and wall clips. Together, these measures protect chicks from predators and prevent smaller chicks from escaping. The lining and reinforced connections should be considered alongside access and any planned changes, so the enclosure continues to serve its purpose when chicks are moved or the space is adjusted.
How do professionals build a brooder and grow-out coop step by step?
A professional build starts with the intended footprint and the way chicks will use each space. One example combines brooder and grow-out areas in a structure measuring about 4 feet by 4 feet. That compact plan gives the builder a defined base for arranging the frame, enclosure, access, and roof. The layout also helps keep the brooder section distinct from the space intended for growing chicks.
First, the builder establishes the frame. A brooder pen frame can use treated 2×4-inch lumber, while the top can be made with 2-by-4-inch pieces. In one design, 4-by-4-inch pieces form the side supports. These members serve different parts of the structure, so the plan identifies their locations before assembly. The frame’s shape and joins provide the foundation for attaching wire and roofing.
Next, the builder fits the enclosure. Hardware cloth is secured to the frame with short deck screws measuring 1 to 1½ inches and washers. The washers help hold the wire at its attachment points. Placement matters: the cloth should meet the frame cleanly at edges and corners, rather than leaving openings between sections. A professionally assembled enclosure keeps the brooder and grow-out spaces defined while allowing the design to remain open and ventilated.
Then, the builder plans the roof. In one example, the pen and its roofing sheets were each about 8 feet long. Two corrugated polycarbonate roofing sheets overlap to cover the pen. That overlap is part of the roof assembly, not a substitute for a sound frame beneath it. The builder arranges the sheets so they cover the intended area and remain supported by the wooden structure.
After the outer structure takes shape, tailor the interior surfaces to its placement. One indoor chick setup used plastic chicken mesh and brown paper on its walls to help contain heat and wood-chip bedding while keeping indoor cats away from the chicks. Those materials suit an indoor use case; outdoor enclosures need materials selected for weather exposure and protection. Account for that distinction in the initial design.
Finally, check how the parts work together. Ensure the access area serves both the brooder and grow-out spaces, and that the wire stays secured where panels meet. The roof should cover the intended enclosure, with its supports aligned to the frame. These checks can reveal gaps or awkward connections before chicks move in.
- Set the layout: Define the footprint and the relationship between brooder and grow-out areas.
- Assemble the frame: Place treated 2×4-inch framing, top pieces, and 4-by-4-inch side supports according to the design.
- Attach the enclosure: Secure hardware cloth with 1 to 1½-inch deck screws and washers.
- Fit the roof: Arrange two overlapping corrugated polycarbonate sheets over the structure.
These stages turn a drawing into a usable coop, with each material serving a clear purpose. A thoughtful build coordinates the footprint, frame, wire, and roof to support both brooding and grow-out needs.
How to Safely Move Chicks to the Grow-Out Area
A safe transition follows the chicks’ development, not just the coop’s schedule. In one setup, chicks moved into the Start and Grow Unit’s two grow-off pens at 4 weeks, with 24 chicks placed in each pen. That example illustrates how a divided grow-out area can separate a flock as it leaves the brooder. The appropriate timing and arrangement depend on the chicks’ readiness and the space available.
At the move into grow-out pens, the enclosure should already be ready for the birds. A professional plans the route from brooder to pen and considers how the chicks will be contained during that change. The receiving area needs to suit the flock size and give caregivers access for observation and routine care. Dividing birds between pens, as in the 24-per-pen example, can make the transition more orderly than placing the whole group in one space.
Moving into a grow-out pen does not automatically mean chicks are ready to live outside full-time. Baby chicks can generally make that final move at around nine to 10 weeks old if they are fully feathered. Feathering is a key readiness sign because it affects how well young birds can manage outdoor conditions. Age alone is not enough; the coop’s placement and the weather matter too.
For full-time outdoor housing, the outdoor temperature should be no lower than 50 degrees. When conditions are colder than 50 degrees, young chickens still need supplemental heat, especially at night. That makes nighttime conditions important in transition planning, rather than relying only on how warm the daytime feels. If colder weather is expected, the move to outdoor living should account for continued heat needs.
Before the final move, introduce chicks to outdoor conditions through gradually longer visits. This staged acclimation lets them experience the outdoor setting before staying there full-time. Extend the visits over time instead of moving directly from indoor brooding to continuous outdoor exposure. Plan the coop’s layout and access to support this gradual transition and keep the move manageable for birds and caretakers.
- Move into grow-out pens: At 4 weeks, one example places 24 chicks in each of two pens.
- Assess readiness for outdoors: Around nine to 10 weeks, full-time outdoor living may suit fully feathered chicks.
- Consider temperature: Keep outdoor conditions at or above 50 degrees for the full-time move; colder weather means supplemental heat, especially overnight.
- Acclimate gradually: Build up outdoor visits before chicks remain outside full-time.
A brooder and grow-out pen combination coop works best when both stages are planned together. The brooder supports young chicks, while the grow-out area provides space as they develop. Separating these functions can make the move more predictable, but does not replace assessing feathering and outdoor conditions. A suitable layout and access can support a gradual transition.
Plan the transition into the coop’s design: consider where the grow-out area sits, how caregivers reach it, and how chicks move between spaces. The layout should reflect the flock and outdoor placement, rather than treating the brooder and grow-out sections as interchangeable. This connects construction choices with the practical timing of each move.
What predator-proofing and fire-safety features should a combination coop have?
Protection starts with the enclosure’s openings, base, and location. A pen with 1/4-inch hardware cloth on its sides helps deter predators and rats. The mesh must cover the sides rather than stopping short at a frame edge, where a gap could weaken the barrier. Doors and joins between panels also need secure closures, especially where chicks occupy the pen.
The ground is another point of entry. For a permanent pen or a site with greater tunneling-predator risk, use 1/2-inch hardware cloth attached to the bottom. A different example uses a sturdy 2×4-inch wire fence laid on the ground of the chicken run beneath the pen’s open base. That ground layer helps protect against larger digging predators. The choice depends on the pen’s permanence and the risk of predators tunneling underneath.
Location adds another layer of protection. An outdoor coop can sit inside a predator-proof run, enclosing the birds within a larger protected area. Even with secure coop sides, the surrounding run becomes part of the barrier. The base, sides, doors, and run should work together rather than relying on one feature alone.
Choose materials for the coop’s final setting. For example, plastic mesh and paper used indoors may be replaced with metal hardware cloth and wood when the grow-out coop moves outside. Indoor materials used to contain heat or bedding are not necessarily durable outdoor barriers. Plan for this change before moving the coop.
Fire safety belongs in the plan because a brooder uses heat. Chicks need a brooder temperature of 95 degrees during their first week of life. After the first week, the temperature can be decreased by five degrees each week. The coop’s layout should therefore account for the heat source and its relationship to bedding, wood, and the enclosure. A builder can incorporate the intended heating arrangement into the design, rather than leaving it as an afterthought.
As brooder temperature changes, the heat setup remains part of daily care. The structure should allow access to the brooder area and keep materials organized for that use. Fire-conscious planning considers how the heat source fits the coop, where bedding sits, and how the enclosed space is arranged. Follow the heating equipment’s directions; design considerations are not a substitute for safe operation.
- Cover the sides: Specify 1/4-inch hardware cloth for predator and rat protection.
- Consider the base: Use 1/2-inch hardware cloth beneath permanent pens or sites with greater tunneling risk, or a 2×4-inch wire fence layer in the run.
- Secure the setting: Place the outdoor coop within a predator-proof run.
- Plan for heat: Account for 95 degrees during the first week, then a five-degree decrease each week afterward.
A well-planned coop treats predator barriers and brooder heat as connected design needs. Considering wire, base protection, outdoor materials, and heat placement together helps create a structure suited to the chicks’ environment and changing care needs.
Southern Chicken Coops: Coop Delivery
Southern Chicken Coops offers Coop Delivery and Custom Chicken Coops for poultry keepers planning a purpose-built home. If your design needs to support chicks through brooding and grow-out, a custom coop can be shaped around your flock’s needs and intended setting. Share the features that matter to your plans, such as movable construction, distinct spaces for different growth stages, and outdoor protection. Those priorities help guide a practical conversation about the coop you have in mind. Coop Delivery provides a natural next step once you’re ready to arrange delivery of your coop. Contact Southern Chicken Coops to discuss your coop plans.
Bring Your Coop Plans Into Focus
Turn your priorities into a clear design brief. Consider how the finished structure will fit your property, how you plan to use each space, and what matters most for your flock’s care. These choices help shape a brooder and grow-out pen combination coop around your routine instead of forcing your routine into a standard layout.
Share the purpose of the coop, the setting where it will stand, and the features you want considered. A conversation about those needs can help you move from general ideas toward a practical design and delivery plan. If you’re ready to discuss the project, contact Southern Chicken Coops. With thoughtful planning, you can take the next step toward a well-crafted home for your birds.
Frequently Asked Questions
What is a brooder and grow-out pen combination coop?
A brooder and grow-out pen combination coop brings early chick housing and a later grow-out space into one planned structure. The brooder area supports chicks while they need a controlled environment; the grow-out area gives them separate space as they develop. A useful design makes the transition manageable and accounts for access, bedding, ventilation, and final placement.
What size brooder and grow-out area is needed for each chick?
There isn’t one floor-area figure that fits every chick at every growth stage. The space needed depends on the birds’ age, how long they’ll use the enclosure, and how much floor area remains usable around feeders and waterers. As a separate adult-flock planning reference, allocate 8 square feet of run space per bird if chickens aren’t free-ranged. That adult figure shouldn’t be treated as a chick-brooder measurement.
How many chicks can a combination brooder and grow-out coop hold?
Capacity depends on usable floor area and how the spaces are divided, so no single figure applies to every design. Consider the flock and the chicks’ growth stage: a layout suitable for young chicks may not provide enough room as they grow. Plan capacity around the actual footprint and whether chicks will share an area or occupy separate sections.
What materials and layout work best for a brooder and grow-out pen combination?
Choose materials and an arrangement suited to the coop’s location, exposure, and intended use. For a Texas build, consider the local setting and how the enclosure will serve chicks through changing growth stages. Plan distinct brooder and grow-out zones, practical caregiver access, and surfaces suited to the bedding and cleaning routine. Build these needs into the layout from the start.


