

A brooder is a sheltered, heated home where young chicks can stay warm, dry, and protected. When setting up a brooder in Texas, plan for a warm zone and a cooler area chicks can move to, and keep the heated space at 95 degrees Fahrenheit during their first week. A secure location matters as much as the heat: direct sun can make an outdoor brooder dangerously hot.
It’s natural to focus first on the heat source, but chicks also need room to move, dry footing, fresh air, and easy access to feed and water. A steady setup helps you meet those needs and avoid common problems such as overheating, drafts, and slippery bedding.
This guide covers brooder space, bedding, feeders, safe heat, and ventilation for Texas conditions. You’ll learn how to prepare a sheltered location, read chick behavior, and adjust the setup as your flock grows, so the first weeks begin in a comfortable, well-prepared space.
Key Takeaways
- Choose absorbent, large-flake pine shavings and keep the bedding dry to give chicks secure footing.
- Place feeders and waterers where every chick can reach them, then raise them as the flock grows to help limit spilled feed.
- Allow room for chicks to spread out and plan to expand the brooder as they grow.
- Set up a warm zone and a cooler zone, secure the heat source, and watch chick behavior to guide adjustments.
- Choose a sheltered spot away from direct sun, drafts, and dampness to help protect chicks in Texas weather.
Bedding choices and spraddle-leg prevention
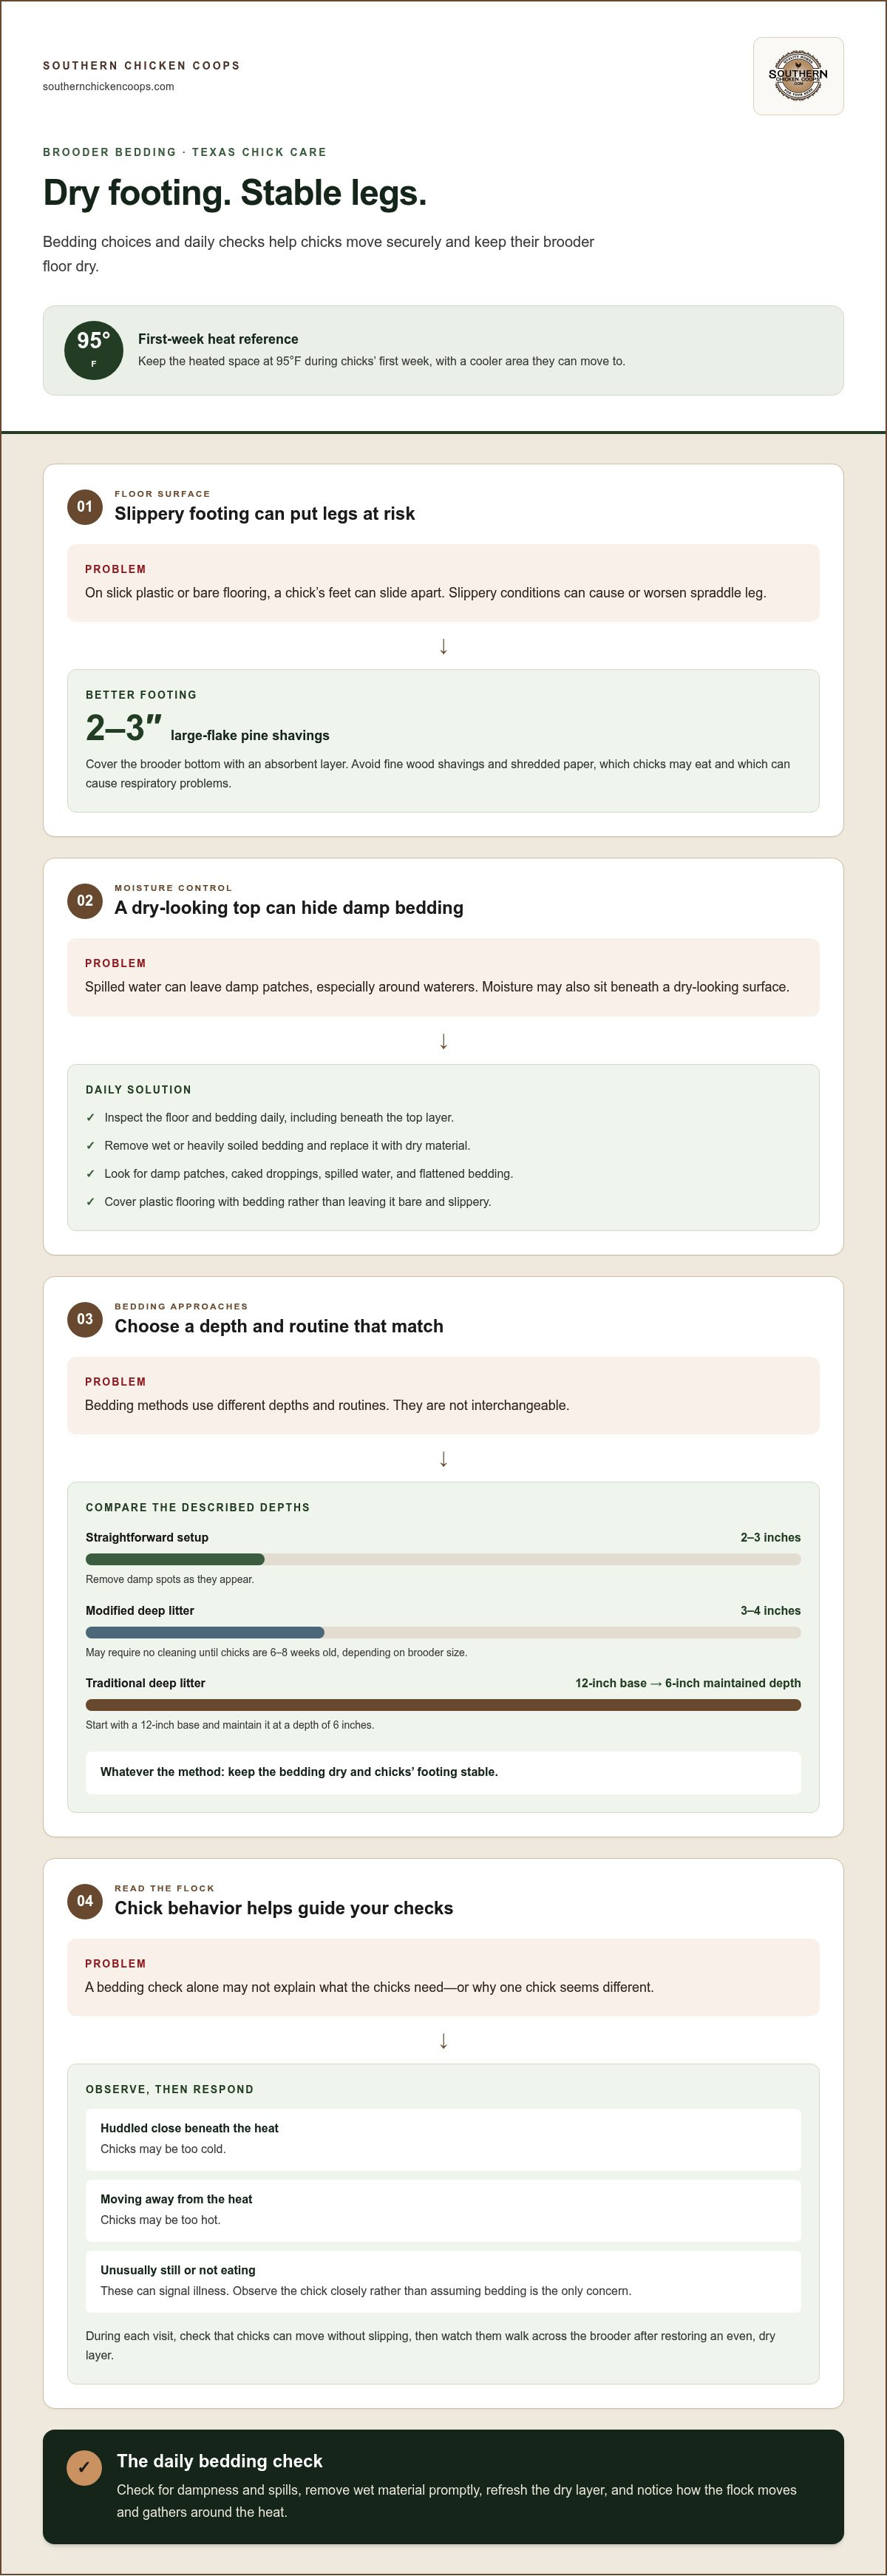
Cold chicks huddle beneath the heat source, while overheated chicks move away. Unusual stillness or not eating can signal illness. Use absorbent bedding, keep the floor dry, and check the chicks and their footing daily.
-
Choose bedding to prevent spraddle leg
Cover the brooder bottom with 2-3 inches of large-flake pine shavings. This absorbent bedding gives chicks a more secure surface than slick plastic or bare flooring, where their feet can slide apart. Slippery conditions can cause or worsen spraddle, when a chick’s legs splay outward. Avoid fine wood shavings and shredded paper, which chicks may eat and which can cause respiratory problems.
-
Check flooring and bedding moisture
Inspect the floor and bedding daily, especially around waterers, where spills can leave damp patches. Remove wet or heavily soiled bedding and replace it with dry material. Check beneath the top layer too, since a dry-looking surface can hide moisture. Cover plastic brooder flooring with bedding rather than leaving it bare and slippery.
-
Choose a bedding method that suits your routine.
For a straightforward brooder setup, begin with the 2-3-inch layer and remove damp spots as they appear. A modified deep litter method uses 3-4 inches of bedding, while traditional deep litter starts with a 12-inch base and is maintained at a depth of 6 inches. These methods have different depths and routines, so don’t treat them as interchangeable. Whichever approach you use, keep bedding dry and chicks’ footing stable.
-
Watch chick behavior during each check.
Watch where the flock gathers in relation to the heat source. Chicks clustered close beneath it may be too cold; chicks spreading away from it may be too hot. Check that they can move without slipping, and note if one chick stays apart or seems unusually inactive. Reduced appetite or unusual stillness can point to illness, so observe the chick closely rather than assuming the bedding is the only concern.
-
Make daily care part of the bedding routine.
During each visit, look for damp patches, caked droppings, spilled water, and flattened bedding. Remove wet material promptly and restore an even, dry layer, especially where chicks walk and rest. Watch the flock move across the brooder afterward. Secure footing helps prevent slipping and supports normal movement. Regular checks can also reveal a leaking waterer before moisture spreads.
At Southern Chicken Coops, we recommend addressing any water spills before bedding gets completely saturated. Modified deep litter can require no cleaning until chicks are 6-8 weeks old, depending on brooder size.
Clean a chick brooder consistently for the first 6 to 8 weeks.
Feeder selection and placement
Choose chick-safe feeders and waterers that are easy to clean and adjust as the flock grows. Place them where chicks can reach them, away from shavings and the heating zone.
-
Select chick feeders and waterers
Choose a waterer designed for chicks, with a stable base and openings they can reach safely. A 1-quart chick waterer suits batches of up to 25 chicks during their first week. For feed, use a shallow chick feeder that lets birds eat without climbing inside or scattering starter across the brooder. Check that both containers come apart easily for cleaning.
-
Place feeders and waterers
Set feed and water on a level surface where chicks can reach them without crossing the warmest part of the brooder. Keep the waterer away from the heat source, as warmth can encourage water to spill or evaporate. Leave room for chicks to gather without crowding, and check nearby bedding daily for splashes and spilled feed.
-
Set up enough feeding and drinking access.
Use one or two 1-liter feeders and waterers for a small group, then watch whether every chick gets a turn. A 1-gallon chicken waterer has also been used for a group of 30 chicks. Those examples are starting points, not a substitute for observing the flock: if chicks crowd, push one another aside, or leave some birds waiting, add another access point.
-
Keep feed appropriate to the chicks.
Offer chick starter in a feeder that prevents birds from standing in the feed. Broiler chicks are recommended to receive 22-24% protein broiler starter during their first four weeks. Layer chicks are recommended to receive chick starter with 18-20% protein during their first eight weeks. For chicks younger than 1-2 weeks, scattering a little feed on the bedding can encourage foraging, but keep it fresh and clear of droppings.
-
Raise equipment as the flock grows.
As chicks grow taller, place feeders on small blocks so the openings sit above the bedding. This helps keep shavings out of the feed tray. Keep each base stable and make sure smaller chicks can still reach the feed and water. Adjust the height gradually, guided by the birds’ posture and access.
-
Make cleaning and coop planning part of the routine.
Clean feed and water containers regularly, and refill them before they run empty. A good poultry waterer should be safe for chicks, simple to use and clean, and adjustable as they grow. If you’re planning permanent housing, a custom chicken coop can be tailored to your poultry needs, including how you intend to arrange feeders and waterers.
Brooder dimensions and chick space requirements
Size the enclosure for the chicks’ next growth stage, not just the day they arrive. Before raising chicks, prepare a sheltered, secure brooder with enough room for them to move away from the heat.
- Plan space for each growth stage. Allow 0.5 square feet per chick at one week of age, then 0.75 square feet at four weeks. Chicks need at least 1 square foot each during weeks three and four, and 2 square feet during weeks five through eight. For example, a 25-chick batch needs at least 12.5 square feet during its first two weeks. Expand before crowding begins.
- Choose an enclosure that contains active chicks. Brooder sides should be at least 18 inches high, and walls deeper than 12 inches help prevent three-week-old chicks from jumping out. A plastic storage bin may suit a small group for 3 to 4 weeks, depending on breed. A larger poultry setup gives growing chicks more room to spread out.
- Prepare the brooder before the chicks arrive. Add bedding, feeders, waterers, and a heat source, then run the brooder at a stable temperature for at least 24 hours. Newly hatched chicks need a heated space of 95 degrees Fahrenheit during their first week. Check the enclosure for drafts, loose edges, spills, and access points predators could use.
- Gather the basic brooder supplies. A practical setup includes bedding, chick feeders and waterers, and a safe heat source, such as a heat lamp or heat plate. Arrange supplies so chicks can reach them while leaving room to move. The brooder can be a plastic tub, stock tank, or kiddie pool sized for the flock’s growth.
- Budget for a simple enclosure and shop locally. In Texas, chicks are available through hatcheries and local poultry or farm-supply stores. Farm-supply and feed stores commonly carry brooder essentials.
- Secure the heat source and protect chicks from predators. Don’t use a cardboard box: heat sources can create a fire hazard, and spills can damage the box. Secure heat lamps with a wire guard and a fixture rated for the bulb’s wattage. Keep chicks indoors or in a covered enclosure predators can’t reach, while allowing ventilation and preventing drafts.
- Transition chicks when outdoor conditions suit them. Chicks typically stay in a brooder for their first 5-8 weeks. Begin moving them to outdoor housing when daytime temperatures are stable and at or above 60°F. Make sure the poultry housing protects them from drafts and predators, and adjust their transition to the conditions they experience outdoors.
Heat lamp safety and ventilation
Keep the heated area at 95 degrees Fahrenheit in week one, then decrease it by 5 degrees each week: 90°F at 1 to 2 weeks, 85°F at 2 to 3 weeks, 80°F at 3 to 4 weeks, and 75°F at 4 to 5 weeks; use 70°F from week six onward. Texas summers can overheat a brooder, while winter cold increases heating needs, so provide a warm zone and cooler space.
-
Choose a brooder heat source
Choose a heat lamp, heat plate, or mama heating pad setup, and make sure chicks can move away from the warmth. Set a newly installed heat lamp 18-20 inches above the bedding, over one side of the brooder. This leaves an unheated area where chicks can cool down. Keep the heat source secure and away from pine shavings, which can catch fire.
-
Account for Texas seasonal temperatures
Position the brooder out of direct sun, which can make it dangerously hot. On hot Texas days, monitor the cooler zone and the chicks’ behavior instead of adding heat automatically. In cold weather, maintain a warm area while allowing ventilation. Don’t seal the brooder so tightly that stale air and moisture build up, and don’t aim a fan directly at the chicks.
- Secure the lamp and fixture. If using a 250-watt heat lamp, pair it with a ceramic fixture rated for 250 watts, a wire guard, and secure mounting. Keep the lamp from touching the enclosure, bedding, or other materials. Check that its position stays fixed, since a loose or fallen lamp can create a fire hazard. Avoid cardboard brooders around heat sources.
- Read chick behavior and adjust heat. Chicks clustered close beneath the heat source may be too cold; those moving away and spreading out may be too hot. Adjust the lamp or heating setup gradually, then observe where the flock settles. A comfortable pattern includes chicks using both the warm and cooler areas rather than crowding into one spot.
- Keep ventilation gentle and bedding dry. Allow fresh air to circulate without creating a draft across the chicks. Check for moisture around waterers and remove damp bedding, since wet, slippery footing can affect movement. Dry bedding and steady airflow help keep the brooder comfortable. Watch for respiratory distress or unusual behavior, and assess the birds and their surroundings promptly.
- Test the setup before chicks arrive. Run the brooder at a stable temperature for at least 24 hours before placing chicks inside. Measure the warm area at chick level, then confirm a cooler area remains available. Recheck the heat source after moving equipment or changing bedding, because either change can alter the warmth chicks experience.
Preparing a sheltered brooder location
Choose a sheltered spot where chicks can escape direct sun, drafts, and sudden temperature changes. In Texas, a shaded garage or protected indoor area can make brooder conditions easier to manage.
- Choose a location before bringing chicks home. Look for a level area away from open doors, busy walkways, and direct sunlight. Direct sun can kill baby chicks in 2 hours or less, so don’t rely on shade that shifts during the day. Check the spot at different times and consider how sunlight moves across the room or shelter.
- Protect the brooder from Texas heat. Summer temperatures can rise to 100°F or higher, making an outdoor brooder difficult to keep comfortable. Avoid placing a container where sunlight heats its sides, and leave a cooler area chicks can move into. Use a thermometer to track conditions at chick level, not just the air across the room.
- Plan for cool nights and changing conditions. A sheltered indoor location helps limit exposure to cold air, while ventilation prevents stale, damp air from collecting. Check the brooder temperature and chick behavior after weather shifts. Huddling may mean chicks are too cold; moving away from the warm area may mean they’re too hot.
- Set the container on a stable, dry surface. A stock tank can serve as a sturdy brooder, and a 100-gallon galvanized trough has been planned for use in a Central Texas garage. Whatever container you choose, make sure it sits level and leaves room for bedding, feeders, waterers, and safe movement. Keep it away from standing water and household hazards.
- Check ventilation without creating a draft. Fresh air helps limit moisture and stale odors, but direct airflow can chill young chicks. Position the brooder away from fans and vents that blow straight into it. If using a fan to circulate room air, direct it toward a wall or ceiling, not the birds.
- Observe chicks during regular checks. Note whether they’re eating, drinking, and moving comfortably between warmer and cooler areas. Watch for damp bedding, spilled water, and changes in feather condition. Checks at different times of day can reveal heat or moisture problems that a single thermometer reading may miss.
- Prepare the sheltered area before the flock arrives. Run the brooder at a stable temperature for at least 24 hours, then check the container, heat source, and airflow together. Clear nearby clutter, secure the enclosure against pets and predators, and keep the path to feed and water unobstructed. Plan sheltered housing for your flock as you prepare for their move beyond the brooder.
Southern Chicken Coops: Custom Chicken Coops
Southern Chicken Coops builds custom chicken coops for the next step after brooding: a lasting home for your growing flock. If you’re planning permanent housing, think ahead about how your birds will use the space as they mature. A coop should provide at least 4 square feet indoors per bird.
The signature Polka model is a 6'x12' coop designed for durability and functionality in the Texas climate. Semi-custom designs can be tailored to your poultry needs, while coop delivery helps bring the chosen housing to your property.
Once your brooder plans are in place and you’re ready to plan a coop, contact Southern Chicken Coops to discuss a custom chicken coop for your flock.
Plan for the Flock’s Next Home
Preparing for chicks is also a chance to think about the home they’ll need as they grow. A brooder supports their earliest days, while suitable long-term housing supports a steady routine for your backyard flock. As you continue setting up a brooder in Texas, consider how a future coop will fit your birds, property, and approach to care.
Southern Chicken Coops builds custom chicken coops and delivers completed coops to prepared, level lots. A custom-built coop can connect your early brooder preparations with the next stage of raising chickens. Take time to consider what will suit your flock, then contact Southern Chicken Coops when you’re ready to discuss your coop.
Contact Southern Chicken Coops to discuss a custom coop and delivery for your plans. We wish you a healthy start with your chicks and many rewarding days caring for your flock.
Frequently Asked Questions
What Is a Brooder and Why Does It Matter?
A brooder is a protected space where young chicks rely on a keeper for warmth, shelter, feed, and water. Chicks need a keeper to provide suitable conditions. A well-arranged brooder lets them choose where to rest, eat, and drink, while making it easier to observe their behavior and condition during daily care.
How much brooder space does each chick need as it grows?
Use the age-based space allowance for your flock and multiply it by the number of chicks to find the required usable floor area. Recalculate as they grow instead of relying on the space that worked on arrival day. Account for feeders and waterers in your layout, and watch for crowding around them, blocked movement, or chicks unable to rest apart.
How do you set up a safe chick brooder step by step?
For setting up a brooder in Texas, first choose a sheltered location and an enclosure suited to the flock’s growth. Add secure footing, accessible feed and water, and a heat source with a cooler area nearby. Run the equipment before chicks arrive, then check temperatures at chick level. During daily care, look for spills, drafts, loose fixtures, and changes in chick activity.
When can chicks move from a brooder to an outdoor coop in Texas?
Move chicks when they’re feathered enough for the conditions and their outdoor housing can protect them from cold, heat, rain, and predators. In Texas, assess the coop’s shade, ventilation, and overnight conditions, not just the daytime forecast. Make the transition gradually and observe whether chicks eat and move normally in their new space. Bring them back to shelter if conditions become unsuitable.


