

The lowest-cost coop can turn into the more expensive choice when weak construction means repairs or replacement. If you’re replacing a cheap coop that fell apart, compare the full effort and materials involved in a DIY build with the convenience and construction of a prefab option, then choose a design sized for the flock you expect to keep.
It’s understandable to want a practical replacement after a coop has failed. Look beyond the initial price: consider the materials, construction, layout, and how the coop will handle Texas weather. Southern Chicken Coops builds handcrafted and semi-custom coops in McGregor, Texas, and delivers completed coops to prepared, level lots. Here’s what to consider when planning a replacement and choosing a dependable home for your hens.
Key Takeaways
- Look beyond the initial price: account for materials, hardware, tools, and the work involved when comparing a DIY build with a prefab coop.
- Choose a dry, well-positioned site and sound construction materials to help limit moisture damage and premature repairs.
- Plan indoor, run, and roost space around your flock’s likely growth so a coop won’t feel cramped as your needs change.
- Prioritize sturdy predator barriers and secure construction over cheaper substitutions that may need replacing sooner.
- Before dismantling a collapsed coop, move the birds to a safe space and separate reusable materials from damaged debris.
1. Building a durable coop to avoid repairs or replacement
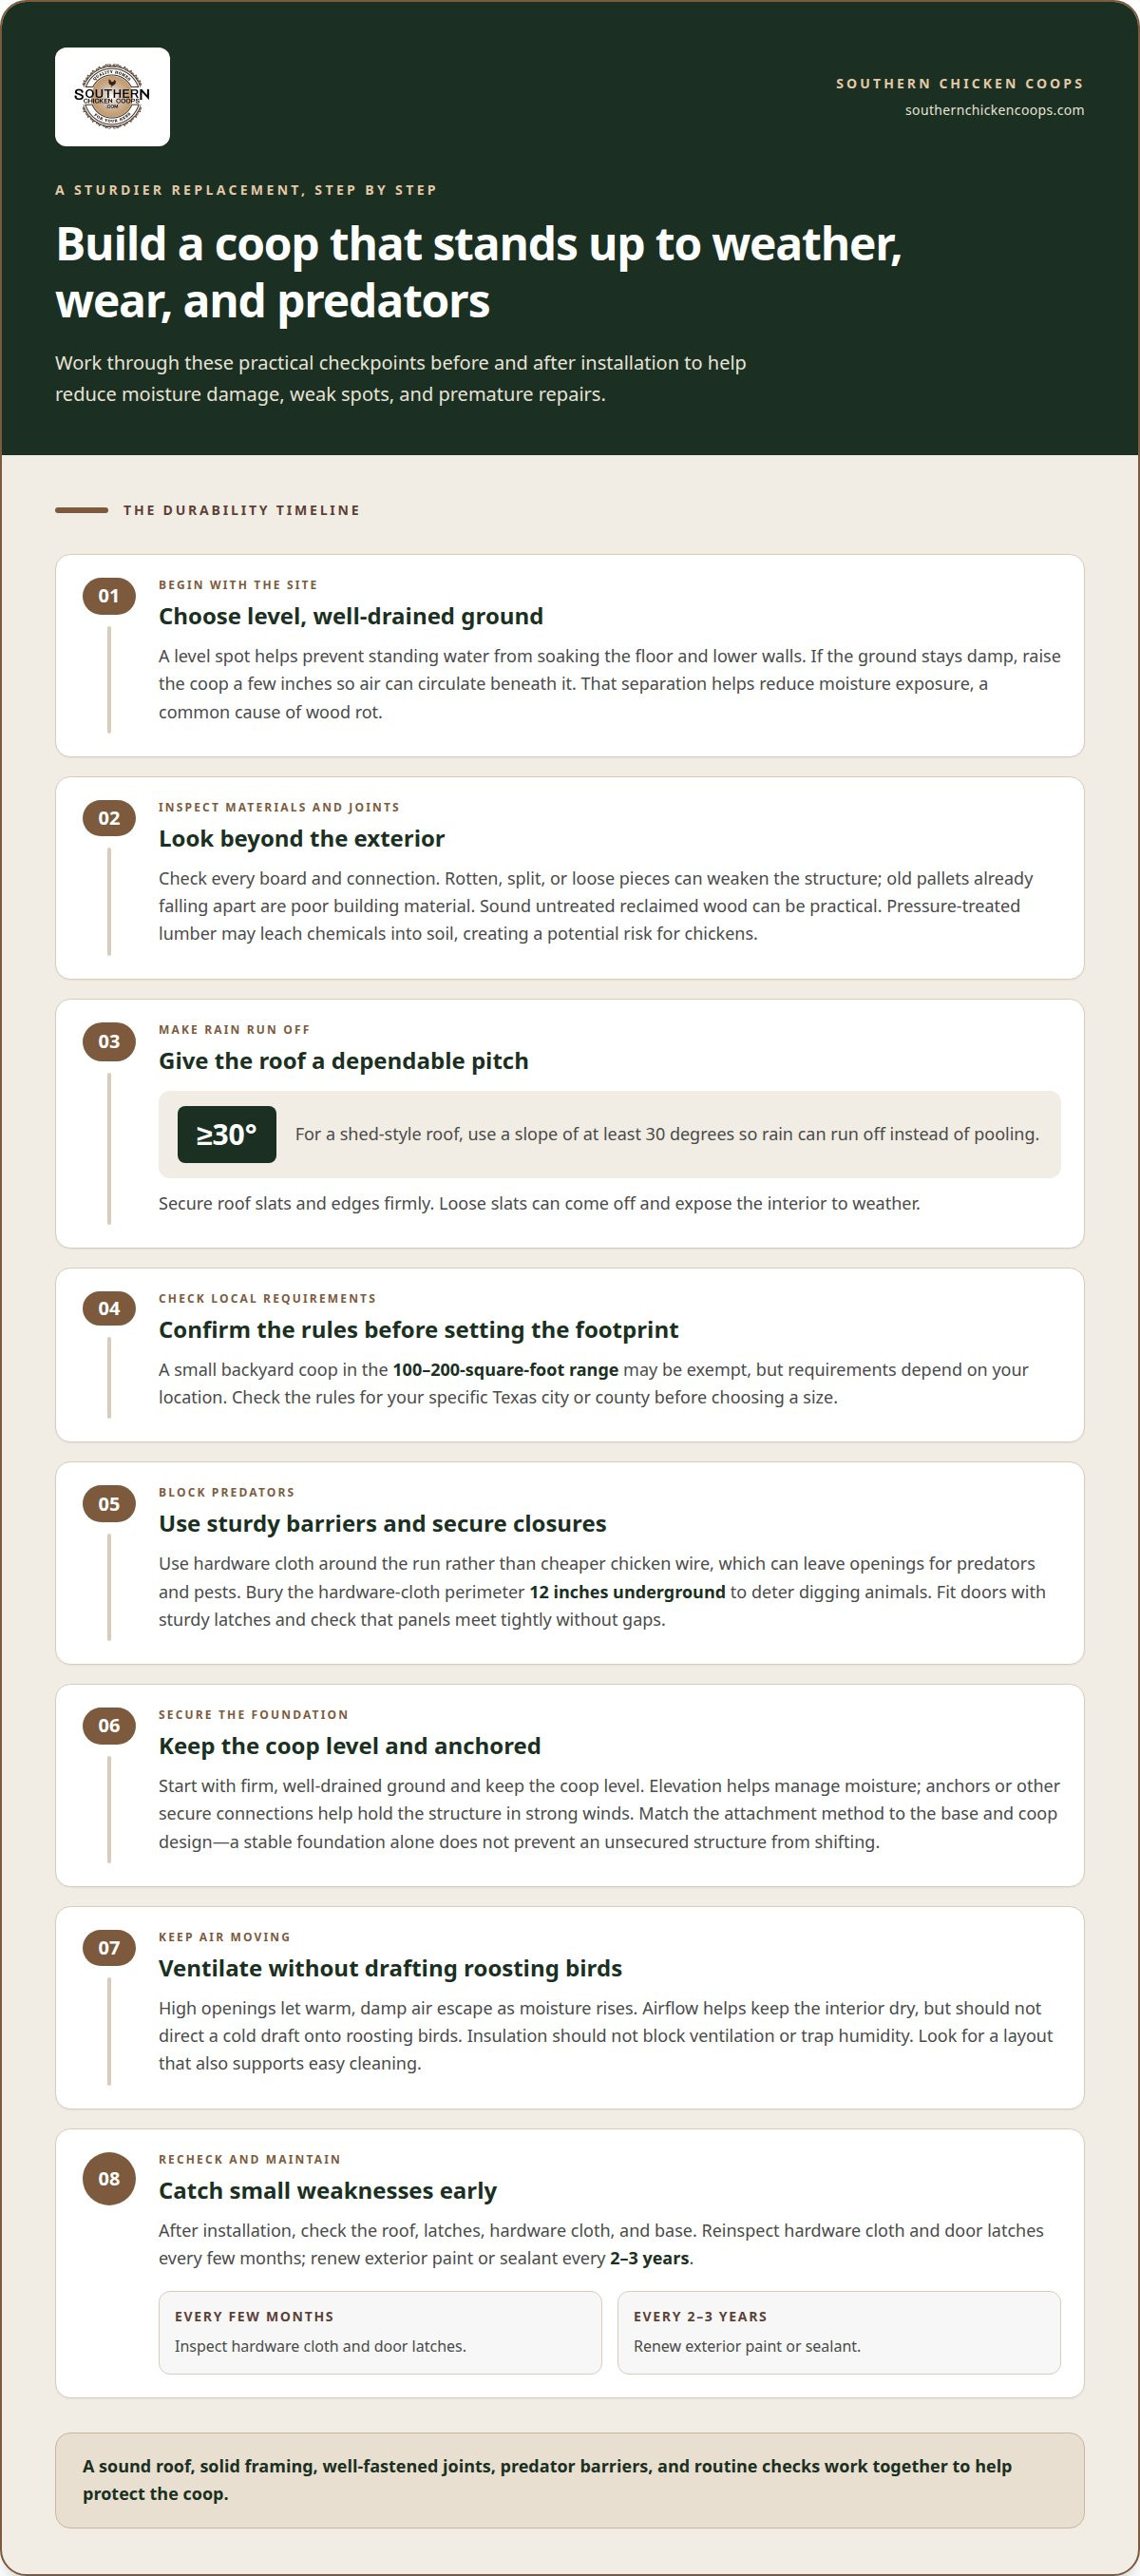
If you're replacing a cheap coop that fell apart, begin with the site before choosing materials. A level, well-drained spot helps prevent standing water from soaking the floor and lower walls. If the ground stays damp, raise the coop a few inches so air can circulate beneath it. That separation helps reduce moisture exposure, a common cause of wood rot.
Next, inspect every board and connection rather than judging a coop by its exterior. Rotten, split, or loose pieces can weaken the structure, and old pallets already falling apart are poor building material. Untreated reclaimed wood can be a practical choice when it’s sound. Pressure-treated lumber may leach chemicals into soil, creating a potential risk for chickens.
Give the roof a dependable pitch so rain can run off instead of pooling. For a shed-style roof, use a slope of at least 30 degrees. Secure roof slats and edges firmly; loose slats can come off and expose the interior to weather. A sound roof, solid framing, and well-fastened joints work together to protect the coop.
Permit and zoning rules depend on your location. A small backyard coop in the 100-200-square-foot range may be exempt, but local requirements determine whether approval is needed. Before choosing a footprint, look up the rules for your specific Texas city or county, since a design that suits one property may not suit another.
Predator protection starts with strong barriers and secure closures. Use hardware cloth around the run rather than cheaper chicken wire, which can leave openings for predators and pests. Bury the run’s hardware cloth perimeter 12 inches underground to deter digging animals. Fit doors with sturdy latches, then check that panels meet tightly without gaps.
For the foundation, choose firm, well-drained ground and keep the coop level. Elevation helps manage moisture, while anchors or other secure connections help keep the structure in place during strong winds. Match the attachment method to the base and coop design; a stable foundation alone doesn’t prevent an unsecured structure from shifting.
Ventilation should let warm, damp air escape without directing a cold draft onto roosting birds. High openings allow rising moisture to leave the coop, while airflow helps keep the interior dry. Insulation should not block ventilation or trap humidity. When comparing replacements, look for a layout that supports routine airflow and easy cleaning.
Finish by checking the roof, latches, hardware cloth, and base after installation. Reinspect hardware cloth and door latches every few months, and renew exterior paint or sealant every 2-3 years. These simple steps can reveal loose connections or weather wear early, before a small weakness turns into another failure. The lessons from replacing a cheap coop that fell apart can guide a sturdier choice this time.
2. DIY coop and prefab replacement costs
Compare the complete setup, not just the initial purchase. A DIY build requires materials, fasteners, hardware cloth, tools, and time for measuring and assembly. Even salvaged lumber may leave you needing hinges, latches, roofing, or paint. A ready-built coop reduces construction work, while delivery and site preparation still form part of the plan. Southern Chicken Coops delivers completed coops to prepared, level lots.
For a fair comparison, list the same essentials for each option. For a DIY build, include framing, roofing, predator barriers, doors, and finishing materials. For a ready-built coop, consider the construction, included features, delivery, and site preparation. Southern Chicken Coops coops include a walk-in run, hardware-cloth predator barriers, metal roofing, and a hen house; compare these features with the complete setup you need.
DIY costs can change as the design takes shape. A plan using reclaimed materials differs from one built with new lumber and hardware. Make a materials list before starting, and separate what you already have from what you need to buy. Leave room in your plan for mistakes or replacement parts, since a miscut board or damaged panel can add time and expense.
A ready-built coop’s value depends on more than its appearance. Compare the frame, roof, doors, and how the panels join. Look for sturdy construction suited to regular outdoor use, not just decorative trim or a product description. Check whether a run is included: Southern Chicken Coops offers models with different layouts, including a hen-house-only design and coops with runs.
To compare durability, examine the physical construction and any written warranty terms. Review what is covered, the coverage period, exclusions, and how to make a claim. Weigh any warranty alongside the materials, joints, roof construction, and intended use. Southern Chicken Coops does not state a warranty, so focus on the coop’s listed construction and features when comparing options.
Think about repairability, too. Accessible panels and replaceable components can make upkeep easier than a design where a small failure affects the whole structure. A loose roof slat, for instance, is a different repair from a weakened frame. Include your time and future maintenance in the comparison, not only the materials list.
Choose DIY if you can build to the needed size and finish the details carefully. Choose prefab if a ready-built structure better suits your time and building skills. If neither standard option fits your site or flock plans, custom chicken coop options can provide a more tailored path. The right comparison is the one that accounts for a complete, usable coop and its expected upkeep.
3. Planning coop size for future flock growth
Size the replacement for the flock you expect to keep, not only the birds you have today. A coop that feels adequate for a small starter group may become crowded if you add hens later. Planning indoor space, run area, roosts, and nest boxes together helps avoid a second expansion or replacement.
Use the flock count to estimate indoor floor space: plan for at least 2-4 square feet per bird. For 2-4 hens, that means 8-16 square feet indoors, with a 4 × 4 ft coop as a recommended size. Measure the usable floor area, not just the outside footprint, since walls and fixed fittings take up room.
Keep the run in the calculation. A recommended allowance is 8-10 square feet of run space per bird, separate from indoor space. For example, a coop that meets the indoor target can still leave too little room if its attached run is small. Planning both areas before choosing a design gives the flock space to move outside and shelter indoors.
Roost length matters as the flock grows. Allow 8-12 inches of roost space per chicken, then arrange the bars so birds can settle without competing for the same section. A roost that suits a few hens may need additional length when the planned flock increases. Include roost placement in the layout rather than treating it as an afterthought.
Nest boxes also need to match flock size. Plan for one nesting box per 3 hens, using 12"×12"×12" boxes. For a small flock of 3 hens, one box is the suggested count, rather than adding several boxes that take up useful floor area. Leave room to access each box for egg collection and cleaning.
Make a simple capacity plan before settling on a coop. Write down the expected flock, indoor area, run area, roost length, and nest-box count. If your plans could shift from 2 hens to 4, size around the larger group. That modest allowance can help prevent overcrowding without building far beyond your needs.
Recheck the layout as you choose a design. A stated capacity alone doesn’t show how much floor space remains after feeders, waterers, and nest boxes are installed. Compare the dimensions with your own flock plan, including room for those essentials. A coop built for future growth should fit the birds and their daily equipment, not merely a number on a label.
For a Texas backyard flock, a 6'x12' coop is one available footprint to consider against your planned bird count and run arrangement. The right fit depends on how much usable indoor space and outdoor run space the full setup provides. A clear capacity plan makes it easier to choose a replacement that can serve your flock as it grows.
4. Prioritizing durable construction over short-term savings
A low purchase price can hide weaknesses that lead to early repairs or another replacement. Compare the parts that protect the structure, not its decorative details. A sturdy frame, securely attached roof, and strong connections matter when a coop must shelter chickens through changing Texas weather.
Start by looking at the materials that face daily wear. Thin panels may flex, while poorly joined framing can loosen with repeated use. Check how the roof meets the walls and how doors attach to the frame. A strong-looking surface won’t compensate for a weak connection underneath it.
Predator barriers are another place where the cheapest substitution can cost more in risk. Chicken wire may cost less than hardware cloth, but it can leave chickens vulnerable to rodents and snakes. Use hardware cloth for the run’s barrier, and make sure the edges and door openings don’t leave gaps. Protection depends on the whole enclosure, not one strong panel.
Consider the local conditions the coop must handle. In Texas, heat, rain, and wind can all affect how a structure performs. Look for secure framing and a well-built roof; Southern Chicken Coops uses silver/galvalume metal roofing as its standard. Shade can help chickens stay cooler in summer, so consider the coop’s location and the yard around it, too.
Think about future upkeep as well. A coop that’s easy to inspect and clean can be more practical than one with hidden connections or hard-to-reach corners. Accessible latches make routine checks simpler, while replaceable boards can keep a damaged section from affecting a larger area. Durability includes being able to address wear before it spreads.
Use a short checklist before deciding: frame strength, roof attachment, predator barriers, door security, and whether worn components can be repaired. Then consider your flock and how you’ll use the coop. A smaller structure that needs major modifications may be a poorer fit than a design made for your needs from the start.
Good construction doesn’t mean choosing the most elaborate design. It means avoiding shortcuts that undermine safety or make daily use difficult. Focus on a stable frame, weather protection, secure barriers, and practical access. Surface trim can remain a secondary consideration.
After installation, regular observation helps reveal early wear. Look for loose fittings, gaps, roof movement, and damage where the structure meets the ground. Addressing a small problem promptly can protect the rest of the coop. A thoughtful build and attentive upkeep work together, giving your flock a safer place without relying on short-term savings alone.
5. How to safely dismantle and dispose of a collapsed chicken coop?
Before dismantling the damaged coop, move the chickens to a secure temporary enclosure. Keep children and pets away from the work area, especially if the roof, walls, or run are leaning. A collapsed coop can shift unexpectedly as pieces are removed, so don’t climb onto it or pull at a section supporting other debris.
Before taking it apart, inspect the whole structure from a safe distance. Look for loose roofing, exposed nails, broken wire, and boards that could fall. Clear a path between the coop and the place where materials will be sorted. Wear sturdy gloves and closed-toe footwear, and use tools suited to the fasteners you can see.
Remove only sections that are stable enough to handle without disturbing heavier pieces. Work from loose, accessible parts toward the larger frame, lowering boards rather than letting them drop. If a wall or roof looks unstable, stop and seek qualified help instead of trying to brace or lift it alone. Keep your hands clear of pinch points where panels meet.
As pieces come down, sort them into separate piles: sound reusable material, damaged wood, metal hardware, and wire. Remove nails and screws from reusable boards only when it is safe to do so. Don’t reuse pieces that are rotten, split, badly bent, or weakened at the joints. A board can look intact and still be unsuitable if its connection failed during ordinary use.
Bag bedding and loose debris separately from construction materials. Keep dusty or soiled material contained during cleanup, and avoid sweeping it into the air. Collect protruding nails and sharp wire before moving a pile. A covered container or sturdy bin can help keep small hazards from spreading around the yard.
Disposal depends on the material and what local waste services accept. Separate clean wood, metal, and general debris, then use the appropriate collection or disposal option in your area. Don’t assume treated, painted, or contaminated material belongs with ordinary household waste. Keep sorted debris secure until removal.
Once the site is clear, inspect the ground for nails, wire fragments, and remaining fasteners. Check nearby fencing and the temporary chicken enclosure, too, so birds can’t reach debris while you plan the replacement. If the old coop stood on a base, remove loose fragments and leave the area stable for the next structure.
Once the damaged coop is cleared, plan a custom replacement coop around your flock and the space available.
Southern Chicken Coops: Coop Delivery
Southern Chicken Coops offers custom chicken coops and coop delivery for keepers planning a sturdier replacement. Turn to us when you’ve settled on your flock’s needs and want a handcrafted coop tailored to your plans, rather than another short-term fix. The signature Polka model is a 6'x12' coop designed for durability and functionality in the Texas climate; semi-custom designs can be tailored to specific needs.
Before choosing a replacement, consider your flock size, available space, and preferred layout. Southern Chicken Coops builds handcrafted and semi-custom coops in McGregor, Texas, and delivers completed coops to prepared, level lots. Contact Southern Chicken Coops to discuss a durable coop for your flock.
Give Your Flock a More Dependable Next Chapter
Replacing a cheap coop that fell apart gives you a chance to plan for how you keep chickens now and the flock you may have later. Before choosing a design, consider how your birds use their space, where the coop will sit, and what would make routine care easier. These decisions can help you choose a replacement that suits your needs rather than a temporary fix.
A sound coop is part of the care you provide. Give yourself time to choose a home that suits your birds and your property, instead of letting frustration with the old structure rush the decision. If you’re ready to discuss a replacement shaped around your needs, talk with Southern Chicken Coops.
With a thoughtful plan and a sturdy home, you can look ahead to quieter mornings, safer shelter, and more time enjoying your flock.
Frequently Asked Questions
What makes a chicken coop durable and weatherproof?
A durable coop combines a stable frame, a securely attached roof, reliable doors, and materials suited to outdoor use. Check how the roof edges meet the walls, since gaps can let rain in even when the roofing is sound. In a Texas yard, consider where summer shade falls and whether rainwater drains away from the coop. A level, well-drained site helps keep the structure dry.
How much does a replacement chicken coop cost in the United States?
Replacement cost depends on the coop’s size, materials, construction method, and whether the run is included. A DIY budget also needs to account for hardware, tools, and your building time; a prefab purchase may involve delivery and site preparation. Compare complete setups rather than bare coop prices. Include any repairs needed to make the structure usable, so an inexpensive starting option isn’t mistaken for the lowest overall cost.
Is it cheaper to build or buy a chicken coop?
Building may suit you if you already have appropriate materials, tools, and the skills to assemble a secure structure. A ready-built coop may be a better fit when your time is limited or you want a completed design. Compare the finished, usable setups and the work each requires, not just the initial materials. Southern Chicken Coops builds complete coops, not DIY kits, and delivers them to prepared lots.
What coop size is needed for the number of chickens?
Plan for at least 2-4 square feet of indoor space and 8-10 square feet of run space per bird. For 3 chickens, that works out to 6-12 square feet indoors and 24-30 square feet in the run. Treat the higher end as useful flexibility if the flock may grow. Also account for feeders and waterers, since equipment occupies space the birds would otherwise use.
What materials resist rot, moisture, and predators in a chicken coop?
Choose sound lumber, a roof that sheds rain, and hardware cloth for predator barriers. Keep wood away from persistent ground moisture by selecting a well-drained site and allowing airflow beneath an elevated structure. Hardware cloth protects openings more effectively than chicken wire against rodents and snakes. Exterior finishes also need periodic attention, since worn paint or sealant leaves wood more exposed to moisture.


