

The calendar isn’t the only thing that decides when chicks can leave the brooder. Getting your coop ready for new chicks means planning for the move at around six to eight weeks, when they’re fully feathered and the outdoor temperature is suitable. Their readiness depends on feather development, weather, and how gradually they’ve adjusted to cooler conditions.
It’s natural to want to give growing chicks more room while ensuring their new home feels secure and easy to navigate. A little preparation can make the transition smoother. Plan the timing, make room inside the coop and run, protect chicks from predators, set up food and water, and account for Texas heat and cooler nights. These steps help you welcome your young flock into a space designed for comfort and safety.
Key Takeaways
- Move chicks to the coop at around six to eight weeks when they’re fully feathered and outdoor conditions are suitable; bringing familiar feeders and waterers can help ease the change.
- Plan for growing birds: chicks require ½ square foot of space each, while mature birds require up to 2 ½ square feet each, according to University of Minnesota Extension.
- Give chicks and older chickens room to adjust during introductions, starting with visual contact before supervised interactions.
- Keep food and water accessible in both the coop and run while chicks settle into their new home.
- Pay close attention to temperature changes, especially hot days and cooler nights, and make sure chicks have a comfortable place to shelter.
1. When Do You Move Chickens From Brooder to Coop?
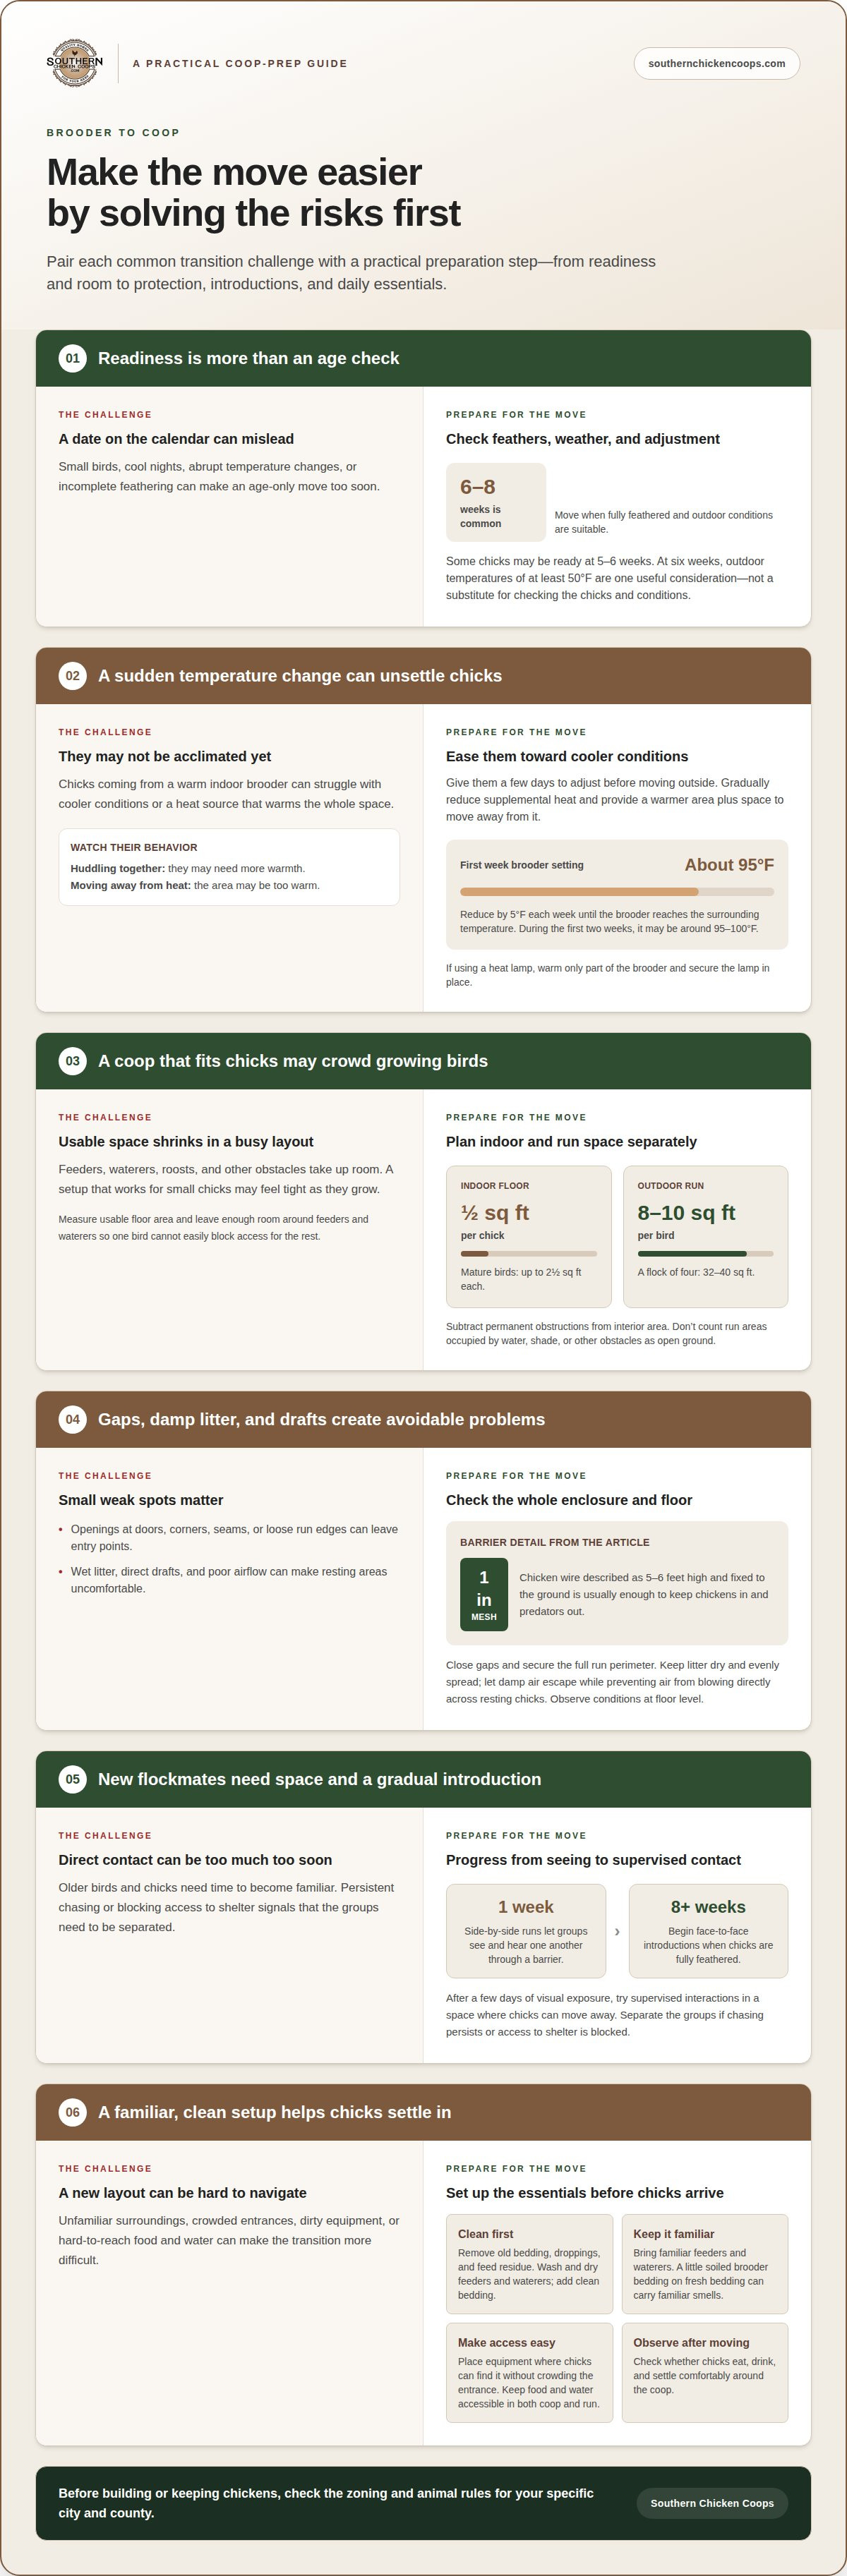
Plan the move around feather development and the weather, not age alone. Chicks often transition from brooder to coop at six to eight weeks, once fully feathered and able to handle conditions outside. Some chicks are ready at five to six weeks, but smaller birds, cool nights, or abrupt temperature changes call for a slower transition. At six weeks, outdoor temperatures of at least 50°F are one useful readiness consideration.
Give chicks a few days to adjust to cooler temperatures before moving them outside. If they’ve been in a warm indoor brooder, gradually reduce supplemental heat and observe their behavior. Huddling together can mean they need more warmth; moving away from the heat source can mean the area is too warm. Consider their feathers and outdoor conditions, rather than relying on age alone.
Set the brooder temperature to about 95°F during a chick’s first week, then reduce it by 5°F each week until it reaches the surrounding temperature. During the first two weeks, the temperature may be around 95–100°F. Provide a warmer area and room for chicks to move away from it, so they can choose where they’re comfortable. If you use a heat lamp, position it to warm part of the brooder rather than the entire space, and secure it so it stays in place.
Make the coop feel familiar before the move. Bring the chicks’ feeders, waterers, and suitable brooder equipment into the coop, placing them where the birds can find them without crowding the entrance. A little soiled brooder bedding on top of fresh coop bedding can carry familiar smells into the new space. Keep food and water easy to reach as chicks learn the layout.
Local rules for backyard chickens and coop construction depend on your city and county. Check the zoning and animal rules for your specific jurisdiction before keeping chickens or building, since requirements can differ between municipalities.
Before chicks arrive, remove old bedding, droppings, and feed residue. Wash feeders and waterers, let them dry, then refill them. Add clean bedding to the coop. Damp or dirty surfaces, spoiled feed, and contaminated water can expose chicks to health risks, while temperature extremes can leave them chilled or overheated. After the move, watch whether chicks eat, drink, and settle comfortably around the coop.
2. Coop floor space and predator-proofing
Measure usable floor space before chicks arrive, then account for feeders, waterers, and roosts. Chicks require ½ square foot of space each, while mature birds require up to 2 ½ square feet each, according to University of Minnesota Extension. Plan enough indoor space for growing chickens to move comfortably without crowding. Keep these figures distinct: the first describes chick and mature-bird space needs, while the larger coop allowance helps plan the home.
For example, calculate the interior area, then subtract permanent obstructions that prevent birds from standing or moving comfortably. Compare that usable space with the number of birds you expect to house as they grow. The transition from brooder to coop can happen quickly, and a layout that fits small chicks may feel cramped as their bodies and feathers develop. Leave room around feeders and waterers so one bird cannot easily block access for the rest.
Plan the run separately from the indoor floor. Allow 8–10 square feet per bird in the run, then multiply by flock size to estimate the needed outdoor area. A flock of four, for example, needs 32–40 square feet of run space under that allowance. If the run feels tight after placing water, shade, or other obstacles, reconsider the layout rather than counting occupied areas as open ground.
Keep litter dry and spread evenly across the floor. Wet patches around waterers can quickly become dirty and uncomfortable, so check those areas during routine coop care. Ventilation should let damp air escape, while openings should be arranged to keep air from blowing directly across resting chicks. In warm weather, maintain fresh airflow; in cooler conditions, don’t seal the coop so tightly that moisture builds up.
Protect the enclosure by checking doors, corners, and seams for openings an animal could use to enter. Close gaps and secure the run perimeter to the ground. One-inch chicken wire measuring 5 to 6 feet high and fixed to the ground is described as usually keeping chickens in and predators out. Check the full barrier, not only the visible front, because loose edges can undermine an otherwise secure enclosure.
Reduce drafts and temperature stress by blocking direct wind from resting areas without closing off ventilation. Observe chicks at floor level, where they spend time, and look for damp litter, strong drafts, or spots they avoid. These clues can reveal airflow or shelter problems before the flock settles into the coop.
If you’re planning a space around a growing flock, explore custom chicken coops as one way to match the layout to your birds’ needs.
3. Providing extra space during introductions
Introducing chicks to an established flock takes more care than moving them into an empty coop. Start with separate areas and a barrier that lets the groups see and hear one another without direct contact. Side-by-side runs for one week give them time to become familiar before sharing space. Watch their behavior, including whether birds crowd the barrier or remain settled.
Begin face-to-face introductions only when chicks are at least eight weeks old and fully feathered. After a few days of visual exposure, arrange supervised interactions in a space with room to move away. Stay nearby and watch how the older birds respond. Brief pecking can happen as chickens establish social boundaries, but persistent chasing or blocking access to shelter means you should separate the groups and return to gradual introductions.
Extra space gives younger birds options during those first meetings. Arrange the coop and run so chicks can retreat from older birds without becoming trapped in a corner. Keep more than one clear path between resting areas and open space, and avoid placing equipment where it creates a dead end. During supervised time, watch whether every chick can move freely, rest, and access the inside shelter.
Make roosting less intimidating with a low bar that chicks can reach easily. A brooder plate beside it can encourage them to settle near the roost while keeping a warm place available. Check that the bar is stable and the area beneath it stays clear. Let chicks approach at their own pace instead of placing them on the perch and expecting them to stay there.
Continue gradual introductions over several weeks, adjusting access to match the birds’ behavior. Start with supervised visits, then allow longer periods together when the flock remains calm. If older chickens repeatedly drive chicks away from food, water, or shelter, separate them and allow more side-by-side contact. Don’t leave chicks alone with the flock until they can move through the shared space safely.
During introductions, preserve a familiar place for chicks to rest inside, even as they explore the run. Keep the entrance accessible so older birds cannot guard the only route in or out. Some chicks may take days or weeks to leave the coop; let them explore without forcing them outside. As pullets approach laying age, they’ll also need calm access to resting and nesting areas.
4. Providing food and water in both the coop and run
During the first days in a new coop, place feed and water both inside and in the run. Chicks may explore outdoors gradually, so duplicate stations help them find what they need without relying on a single route. Keep the indoor setup available while they learn where shelter, food, and water are located.
Use a complete chick starter or starter-grower ration suited to the birds. Chicks should start on feed with 20% protein; broiler chicks should start on a 24% protein ration. The starter-grower feed can remain their main ration from day one through week 18. Read the feed label and keep the selected ration consistent during the transition.
Before chicks begin foraging, complete starter-grower feed should make up at least 90 percent of their overall diet. Treat outdoor exploration as an addition, not a replacement for the complete ration. Keep feed available in a clean feeder, and refill it when the supply runs low. Don’t rely on scattered feed in litter or soil, where it can become dirty or difficult for young birds to find.
Set feeders on a stable, level surface where chicks can gather without crowding. Keep them away from wet litter and places where rain can reach feed in the run. If larger or bolder birds regularly block a station, move it or add another accessible spot. Watch the flock during meals: every chick should be able to approach, eat, and leave without being pushed away.
Fresh, clean water matters as much as feed. Put drinkers in both the coop and run, within easy reach of the chicks. Keep containers stable to limit spills, replace dirty water, and remove wet bedding around the base. Damp bedding beneath a drinker can soil the surface and make the area less inviting.
Check both stations during the day, especially after chicks have been outdoors. Make sure drinkers haven’t tipped, feed hasn’t become damp, and every chick can reach both. As fully feathered birds spend more time outside, keep run stations accessible while retaining an indoor option for shelter and rest.
Temperature affects how chicks use the coop, but they still need steady access to food and water. On hot Texas days, check that water stays clean and available; in cooler or damp weather, inspect indoor stations and bedding more often. If chicks cluster away from a station or avoid a wet area, adjust its placement to keep the route clear and comfortable.
5. Managing coop temperatures in hot and cold weather
Prepare for Texas weather by planning for heat, cool nights, and sudden changes. Chicks don’t regulate temperature like mature birds, so consider their age, feathering, and recent brooder conditions before moving them outside. At six weeks, chickens can tolerate temperatures in the 50s°F; cold-tolerant breeds of that age can tolerate temperatures in the 40s°F. These are different conditions, not a reason to treat every chick or breed alike.
Heat deserves equal attention. Outdoor temperatures above 100°F for several days, sometimes reaching 110°F, can make a coop dangerously hot. Before a heat wave, check that the coop has airflow and shaded shelter, and make sure chicks can move away from sunlit areas. Observe them rather than relying on a single reading: panting, holding wings away from the body, or crowding into the coolest area calls for immediate attention to the environment.
Keep ventilation open while preventing drafts across resting spots. Air should move through the coop to release heat and dampness, while chicks need a sheltered area away from direct airflow. Check the temperature where they actually rest, not just near the door or ceiling. If the coop has warmer and cooler zones, chicks can choose a comfortable place.
Cold nights call for extra attention. Check chicks at bedtime, when outdoor temperatures may still be falling, and look for birds huddled tightly together or avoiding parts of the coop. Fully feathered birds cope better than chicks with developing feathers, but age, breed, and recent exposure to cooler conditions still matter. Give chicks time to adjust before moving them from a consistently warm space into colder weather.
A 40-watt light bulb is suitable for a small chicken coop. Use any supplemental heat carefully, keeping the heat source secure and away from bedding, feathers, and other flammable material. Don’t heat the entire coop so thoroughly that chicks have no cooler area to choose. If outdoor conditions are mild, a dry, draft-protected shelter with good ventilation may be more useful than added heat.
Keep a simple daily routine: check the forecast, inspect airflow and shade, and observe chick behavior at bedtime and during the hottest part of the day. If chicks crowd near a heat source or retreat from a hot area, adjust the setup and reassess their comfort. A coop planned around local weather can make these seasonal adjustments easier. Explore custom chicken coops when you’re planning a home suited to your flock and its conditions.
Southern Chicken Coops: Custom Chicken Coops
Southern Chicken Coops offers custom chicken coops for keepers planning a secure, comfortable home for growing birds. If your flock needs a layout suited to its space, shelter, and seasonal conditions, a custom coop can help bring those priorities together. The signature Polka model is a 6'x12' coop designed for durability and functionality in the Texas climate, and semi-custom designs can be tailored to specific needs.
Coop delivery is also available, making it a natural next step once you’ve considered your flock’s space and setup. Think through how many birds you’re preparing to house and the features that matter in your setting. To discuss a custom coop for your flock, contact Southern Chicken Coops.
Build a Confident Start for Your Flock
The first days in a coop mark the start of a new routine, not the finish line. As your chicks settle in, notice how they use the space, where they rest, and whether their routine changes with the weather. These everyday observations can guide small adjustments and help you prepare for the flock’s changing needs.
Getting your coop ready for new chicks is also a chance to think ahead about the home you want to maintain for years. A well-planned space can support your care routine while giving your birds a sturdy, comfortable place to grow. If you’re considering a coop designed around your flock and setting, talk with Southern Chicken Coops about your plans.
Take the next step at a pace that suits your homestead. With thoughtful preparation and steady attention, you can welcome your chicks into a home made for a good start.
Frequently Asked Questions
When Do You Move Chickens From Brooder to Coop?
Most chicks move outdoors at around six to eight weeks, when they’re fully feathered and conditions suit their age and development. Look beyond the calendar: check their feathers, behavior, and ability to cope with cooler temperatures. As part of getting your coop ready for new chicks, consider how gradually they’ve adjusted to the cold. If a sudden cold spell would expose them to temperatures they haven’t experienced, wait for a more suitable window.
What brooder temperature do chicks need by age?
Start the brooder at about 95°F during the first week, then lower it by 5°F each week until it reaches ambient temperature. Measure at chick level, and make sure the brooder has a warmer area and a cooler area. Chicks move away from the heat when they’re too warm and gather close together when they need more warmth. Adjust the setup as their behavior changes.
What bedding is safe for baby chicks, and how often should it be changed?
Use clean, dry bedding that gives chicks a stable surface, and inspect it daily. Remove wet litter, droppings, and old feed waste, replacing soiled material so chicks aren’t standing in damp spots. Pay special attention beneath drinkers, where spills can quickly wet the bedding. If the rest remains clean and dry, focus on soiled areas rather than waiting for the entire floor to become dirty.
When can chicks move from a brooder into an outdoor coop?
Chicks can move outdoors when they’re fully feathered, commonly around six to eight weeks, and outdoor temperatures suit their age and breed. A six-week-old bird’s readiness depends on the weather and its adjustment to cooler conditions. If chicks have been kept warm, let them experience cooler temperatures gradually before moving them outside. A forecast of dropping nighttime temperatures can be a reason to wait.
What ventilation does a coop need for chicks without creating drafts?
A chick coop needs airflow to release warm, damp air, while resting areas should be protected from direct drafts. Good airflow is essential when getting your coop ready for new chicks, so keep ventilation openings clear and assess the air where chicks perch or settle. If birds avoid a resting spot or air blows directly across it, adjust the airflow or shelter without sealing the coop completely.


