

The motor matters less than how the door fits your flock’s routine. For a custom coop with an automatic door, consider the opening, local weather, available controls, closing cycle, and flock capacity together. A door that works well in one setup may not suit another.
Automatic opening and closing can make daily care easier, but your chickens’ safety still comes first. Start by understanding how the door moves, the conditions it will face, and how many birds need to pass through it.
We’ll walk through those choices, including how to think about opening size and capacity, how weather can affect operation, and why closing speed and control modes deserve attention. You’ll come away with a practical way to assess the details and understand how a thoughtfully built coop can bring them together for your flock.
Key Takeaways
- Match the doorway to your chickens’ size and traffic so birds can move through comfortably without creating a bottleneck.
- Consider how local cold, heat, and changing weather may affect the door’s movement and the coop’s daily routine.
- Choose between light-responsive, scheduled, and manual operation based on when your flock needs access and how much control you want.
- Think through closing speed and the birds’ movements to help reduce the chance of a chicken being caught in the doorway.
- A well-planned custom coop can bring door operation, flock capacity, and weather resilience together in one practical setup.
Automatic door opening sizes and flock capacity
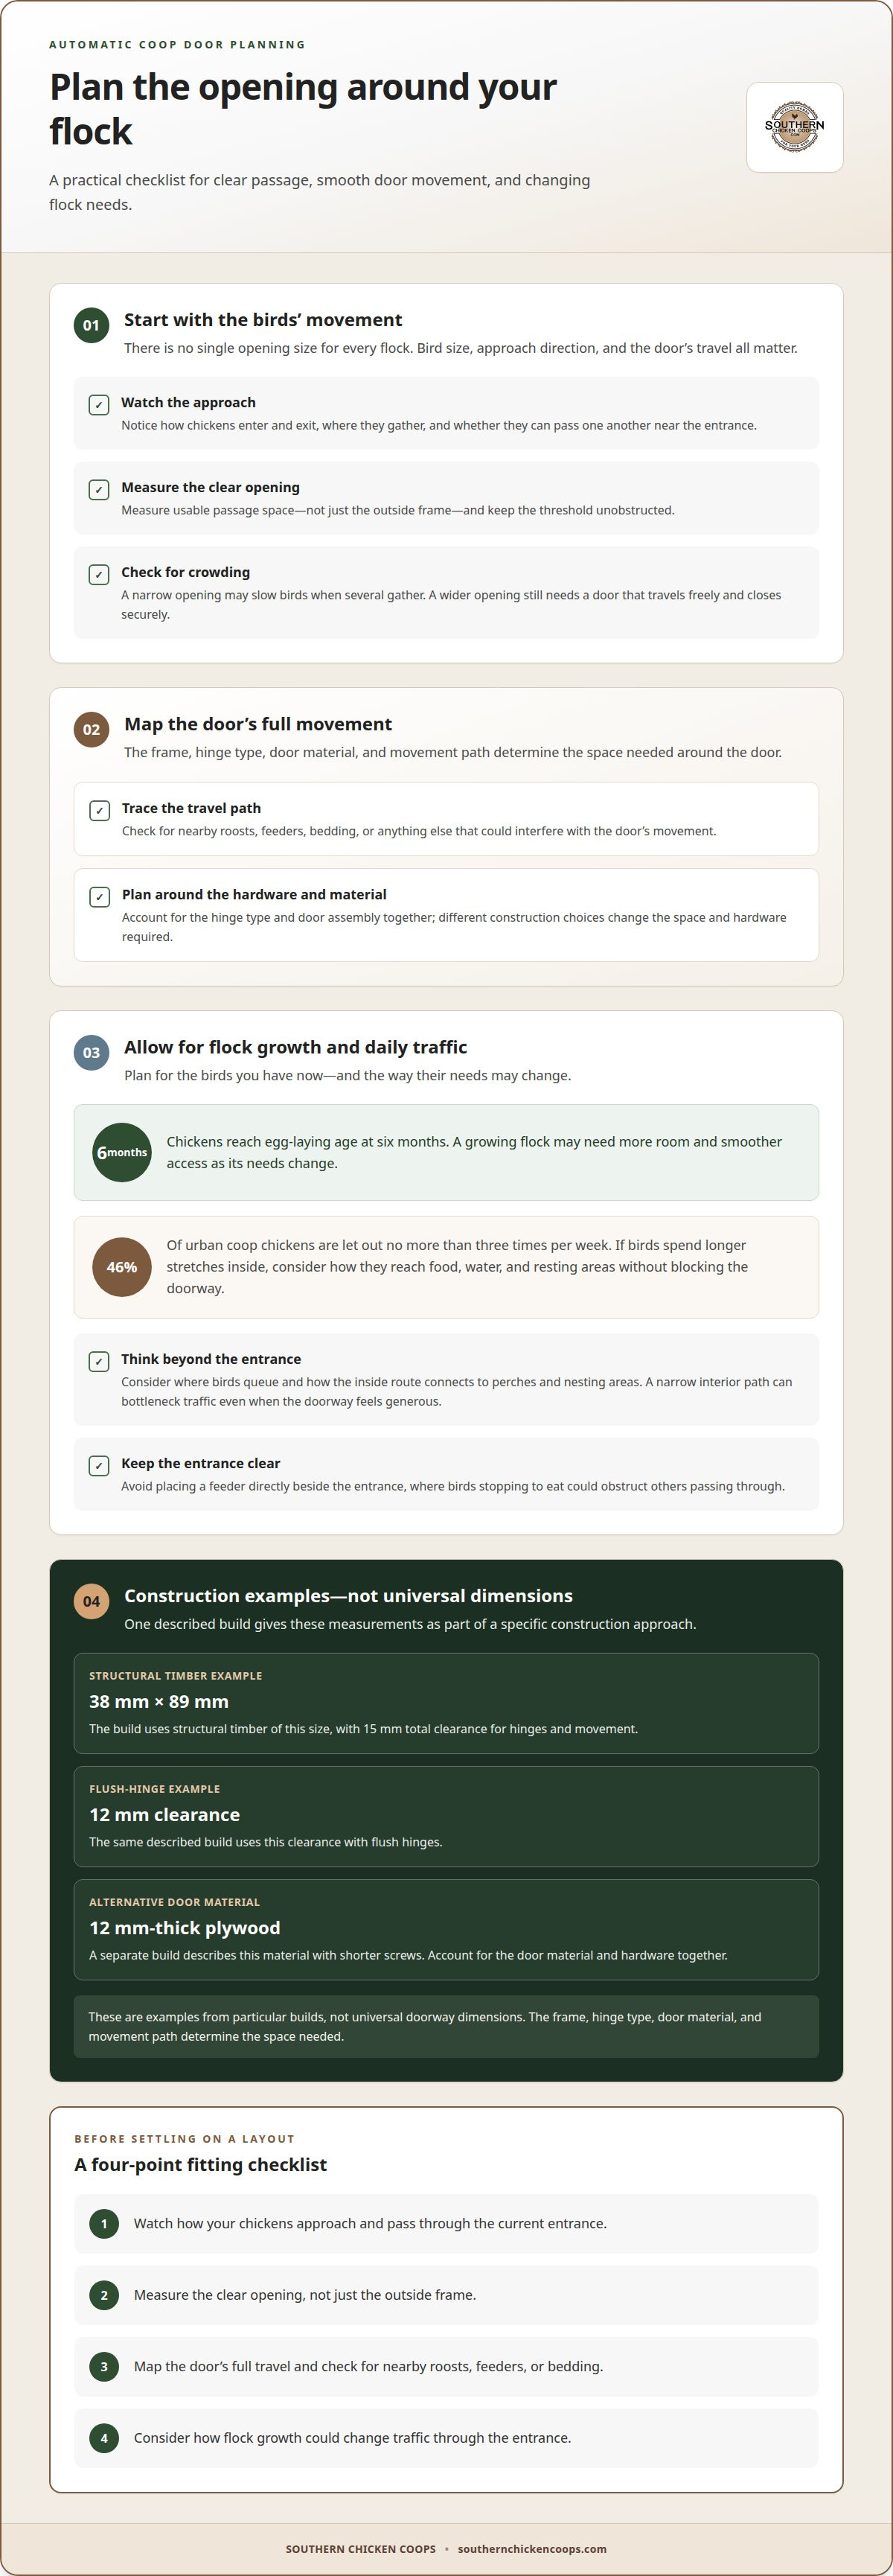
For a custom coop with an automatic door, plan the opening around your chickens’ size and the door mechanism’s travel. Give the flock a clear approach, an unobstructed threshold, and enough room to pass without crowding.
There is no single opening size for every flock. Bird size, approach direction, and door movement all matter. A narrow opening may slow birds when several gather, while a wider opening still needs a door that travels freely and closes securely. Observe your chickens entering and exiting, then plan the opening around their movement rather than appearance alone.
Capacity planning should include future changes, not just the birds living in the coop today. Chickens reach egg-laying age at six months, so a growing flock may need more room and smoother access as its needs change. Think through where birds will queue, whether they can pass one another near the entrance, and how the inside route connects to perches and nesting areas. A narrow interior path can create a bottleneck even when the doorway itself feels generous.
Daily access matters, too. Forty-six percent of urban coop chickens are let out no more than three times per week. If your flock spends longer stretches inside, consider how easy it is for birds to reach food, water, and resting areas without blocking the doorway. For example, avoid placing a feeder directly beside the entrance, where birds stopping to eat could obstruct others passing through.
Build details affect the usable opening. One described door build uses structural timber measuring 38 mm by 89 mm, with 15 mm total clearance for hinges and movement. The same build uses 12 mm clearance with flush hinges. These are examples from a particular construction approach, not universal doorway dimensions. The frame, hinge type, door material, and movement path determine the space needed around a door.
Use this practical sequence before settling on a layout:
- Watch how your chickens approach and pass through the current entrance.
- Measure the clear opening, not just the outside frame.
- Map the door’s full travel and check for nearby roosts, feeders, or bedding.
- Consider how flock growth could change traffic through the entrance.
A separate build describes 15 mm-thick plywood as an alternative door material, with shorter screws. That choice changes the door assembly, so account for the material and hardware together. A well-planned opening balances comfortable passage, manageable door movement, and a layout that serves the flock as it grows.
Cold- and heat-weather operation
Weather affects the coop structure and the door’s movement. Choose durable materials for local conditions, and plan insulation around the temperatures your flock faces. In Texas, account for heat and sudden weather changes by considering shade, airflow, and protection around the doorway.
First, consider where rain, wind, and direct sun reach the coop. A door on a wall exposed to driving rain faces different conditions from one sheltered by an overhang. Place the mechanism where water is less likely to collect, and keep its track or moving path clear of bedding and debris. In hot weather, avoid an entrance exposed to intense afternoon sun.
Cold conditions can affect moving parts. During routine checks, watch for sticking, rubbing, or slower movement, especially after the weather changes. In warm conditions, make sure shifting bedding and passing birds do not obstruct the entrance. The door should move smoothly without extra force.
Power planning also matters across changing seasons. An automatic door can use either a 12-volt battery or a 12-volt power source. Whichever setup you use, place connections where they’re protected from moisture and easy to inspect. Weather exposure can make a sound electrical layout just as important as a properly fitted door.
A reported build remained secure through strong winds during Storm Amy. It illustrates why the door, frame, and surrounding coop wall need to work as one assembly. A sturdy frame helps maintain alignment, and shelter can reduce direct exposure. After rough weather, inspect for shifted parts or anything that might interrupt the door’s travel.
Wood care is another seasonal consideration. Exterior wood on the door should be recoated annually, and the hinges and latch should be oiled twice a year. These intervals support smooth movement and help protect exposed surfaces. Include the door in your regular coop care rather than treating its mechanism as separate from the structure.
Use this weather-focused check as seasons change:
- Look for swelling, rubbing, or debris that interferes with the door’s path.
- Check the frame and exterior finish after periods of rough weather.
- Keep power components sheltered, accessible, and clear of standing moisture.
- Recoat exterior door wood annually and oil hinges and the latch twice a year.
For a climate-conscious layout, consider how the coop’s materials, shade, and door placement work together. A weather-ready coop design can make those details part of the plan from the start.
Choose a durable exterior suited to local rain, wind, and sun exposure, and plan insulation around the temperatures your flock faces. In hot climates such as Texas, include shade and airflow in the design.
Dawn-to-dusk, scheduled, and manual operation
Choose a control mode that suits your flock’s routine and the light conditions around the coop. Timer, light-level, and manual controls each affect when the entrance opens and closes.
Dawn-to-Dusk Controls
A dawn-to-dusk setting responds to changing light, opening as daylight arrives and closing as evening falls. It can follow seasonal shifts without a new clock schedule. Light levels can vary on overcast days, so consider how the control responds when mornings stay dim. A system with both timer and light-level controls offers more flexibility for setting the routine.
Scheduled and Manual Controls
A scheduled control opens and closes at times you choose, giving the flock a consistent routine. Manual operation lets you move the door yourself when plans or conditions change. Consider your daily availability and whether a fixed schedule matches when your birds return. Manual control can be useful when the flock settles in later than usual.
Different modes suit different needs, and some systems combine timer and light-level controls. This lets you set planned opening and closing times while taking light conditions into account, which can help when dawn is overcast. Match the control to your routine rather than assuming one mode works for every day.
Power control also deserves attention. One recommended setup uses a second timer to switch power off five minutes after the door closes, then back on five minutes before it opens. This separates the door’s movement from the rest of its powered period and can prevent the mechanism from remaining energized after a cycle.
Some motors use a non-digital design, so a power interruption will not reset or change their settings. Understand which settings remain in place when power returns, and account for that behavior in your operating plan. A predictable routine is easier to manage than one that requires resetting after every interruption.
Before choosing a mode, walk through a typical day:
- Decide whether light response, set times, or hands-on control best fits your routine.
- Consider dim mornings and how chickens return to the coop at dusk.
- Review how a timer coordinates with the door’s opening and closing cycle.
- Know whether a power interruption changes the motor’s settings.
Then watch the flock as the selected mode operates. If birds are still outside when a light-controlled door is due to close, timer and light-level controls may better suit their routine. If your schedule changes often, manual control lets you respond without changing planned settings.
Door closing speed and chicken safety
Safe operation depends on a clear doorway, predictable movement, and enough time for chickens to pass through. Observe a full closing cycle with the flock nearby, noting whether birds approach, hesitate, or linger at the threshold.
Backyard coop rules vary by location. Zoning, setbacks, flock limits, and nuisance requirements depend on the rules that apply to your property. Consider local requirements when planning the coop’s location and capacity.
Closing speed deserves attention because a bird may pause or turn back as the door begins moving. Observe the entrance at closing time, especially if several chickens return together. If a bird regularly lingers near the doorway, adjust the routine or placement so it can clear the opening before the door moves. Keep bedding, feathers, and debris out of the door’s path, since an obstruction can prevent smooth travel.
Door travel settings are different from speed settings. In one described mechanism, a black dial controls how far the motor opens and closes the door. Follow the door’s instructions for adjustments, then watch a complete cycle. Binding hardware or a crooked frame can interrupt movement, whatever the motor’s capacity.
Power failures and jams can interrupt automatic operation. A battery-powered door may stop when its battery runs down, and bedding or misaligned parts can prevent a full cycle. Keep the path clear, observe the door in motion, and check or replace batteries seasonally. After a power disruption, check that the door has completed its cycle.
Use a brief routine to make door operation easier to assess:
- Watch the closing cycle and make sure the entrance clears before movement begins.
- Remove bedding or debris that could interfere with the door’s path.
- Check alignment and movement after adjusting the travel setting.
- Check or replace batteries seasonally, and inspect the door after a power interruption.
These observations help distinguish an ordinary pause from a mechanical issue. For example, if the door stops at the same point on repeated cycles, inspect for an obstruction or rubbing along its path. If the birds gather at the entrance, observe their return pattern and adjust the timing so they have a clear opportunity to enter. Consistent observation helps keep automatic operation aligned with the flock’s behavior, while a clear opening and functioning mechanism reduce avoidable interruptions.
Automatic coop-door opening and closing
A dependable automatic door must fit the coop opening, move freely, and complete its full cycle. Plan the mounting and power connection around the door’s design before installation.
Reliable Door Compatibility
A compatible door fits the opening and mounting surface, with a clear path for its moving panel. Compare its dimensions, travel direction, and power requirements with the coop frame. One reported build continued working for four years, with its battery replaced a couple of times. That is one experience, not a guarantee for every installation.
To install and wire the door, prepare a straight, secure mounting surface and align the opening with the door frame. Attach the mechanism according to its instructions, connect the specified power source, and test a complete opening and closing cycle before relying on automatic operation. Watch for rubbing, loose connections, or a panel that stops short.
Power compatibility is part of that fit. Automatic coop doors can use either a 12-volt battery or a 12-volt power source. Keep the connection accessible for inspection, and route wiring away from the moving panel. A clean installation lets you observe the mechanism and address a snag without dismantling the surrounding coop structure.
Predator-Proofing the Door
A secure door should meet the frame without leaving an easy gap around its edges. Inspect the closed panel, frame, latch, and nearby wall for openings or loose sections. A misaligned frame can leave a gap even when the door closes, so check the entire entrance.
Check the closed position along the edges and make sure the latch holds. Keep bedding and debris clear of the path, since anything caught there can stop the door from seating properly. A build reportedly remained secure through strong winds during Storm Amy, showing why the door and frame need to function as one sound assembly.
Use this installation check before putting the system into routine use:
- Confirm that the opening and mounting surface suit the door’s dimensions.
- Keep wiring clear of moving parts and connect the specified power source.
- Run a full cycle and watch for rubbing, incomplete travel, or a loose connection.
- Inspect the closed panel, edges, and latch for gaps or an incomplete seal.
Reliable operation depends on a well-fitted door, a compatible power setup, and an entrance that closes properly. Check the entire cycle, not just the moment the panel reaches the bottom.
To manage power around the cycle, the builder recommends setting a second timer to switch power off five minutes after the coop door closes and on five minutes before it opens. Treat this as a timing suggestion, not a substitute for confirming that the door completes its full cycle.
Battery experience can vary: the builder reports that the automatic chicken coop door continued working for 4 years, with the battery needing replacement a couple of times. A commenter reports that the battery in their automatic chicken door lasts about a year. These accounts offer reference points, not a guarantee for another door or installation.
Southern Chicken Coops: Custom Chicken Coops
Southern Chicken Coops offers custom chicken coops for keepers planning a setup around their flock and property. After weighing opening size, weather exposure, controls, and safe door movement, you can bring those priorities into a semi-custom coop design. The signature Polka model measures 6'x12' and is designed for durability and functionality in the Texas climate.
Consider where the automatic door will sit, how chickens approach it, and how the coop layout supports their daily movement. These details make the doorway part of a practical housing plan, not an afterthought. Southern Chicken Coops also delivers completed coops to prepared, level lots.
If you’re ready to discuss a custom coop for your flock, contact Southern Chicken Coops.
Start Planning a Coop That Fits Your Flock
A custom coop with automatic door works best when its design reflects how you care for your birds. Before taking the next step, picture your daily routine: how chickens move through the entrance, where the coop will sit, and which controls feel manageable. These priorities give your coop plan a practical foundation.
Write down what matters most for your flock, then separate essentials from details where flexibility could make the design work better. A thoughtful plan brings function and craftsmanship together in a home suited to your birds and the way you keep them.
Southern Chicken Coops offers custom chicken coops and coop delivery. If you’re ready to explore a coop shaped around your needs, connect with Southern Chicken Coops. Take the next step at your own pace, with your flock’s comfort at the heart of the plan.
Frequently Asked Questions
What features should a custom chicken coop with an automatic door include?
A custom coop with an automatic door should pair a well-fitted entrance with controls and power suited to your daily routine. In Texas, consider weather exposure and how the door’s placement fits the coop layout. For example, Southern Chicken Coops offers an automatic door option with solar-panel or 120 V power. A walk-in run with a 7' 6" interior height can also make daily access more practical for keepers.
How do timer-, light-sensor-, and app-controlled coop doors compare?
Timer controls follow selected opening and closing times, while light sensors respond to changing daylight. App control lets you manage operation through a mobile app when the door system includes that feature. A timer provides a set routine, light response adapts to dawn and dusk, and app control adds a digital way to manage settings. Choose according to your flock’s routine and the controls available in the door system.


