

A chicken run doesn’t have to be a fixed enclosure to work well in a Texas backyard. The best chicken run ideas for Texas backyards combine secure boundaries and overhead protection with practical choices such as sand flooring, garden tunnels, electric poultry netting, or a portable tractor. Each option can help you shape a setup around your space, flock, and daily routine.
Put predator protection first, while also considering drainage, shade, and room for hens to forage. A well-planned run can balance those needs without taking over the yard. This guide covers ways to reinforce an enclosure, when sand may suit the ground, how tunnels can connect chickens with garden areas, and what to consider with movable netting and tractors. You can then weigh a permanent run against a flexible layout and choose an approach that works for your backyard.
Key Takeaways
- Protect the run from predators by planning secure sides, a covered top, and a barrier against digging.
- Choose flooring with drainage and upkeep in mind; sand can offer a practical surface for dust bathing and cleanup.
- Use garden tunnels to give hens a managed path between their run and areas where they can forage.
- Consider electric poultry netting or a portable tractor when you want to rotate access to different parts of the yard.
- Match the setup to your space, flock, and routine so protection and flexibility work together.
1. Predator-resistant fencing and overhead protection
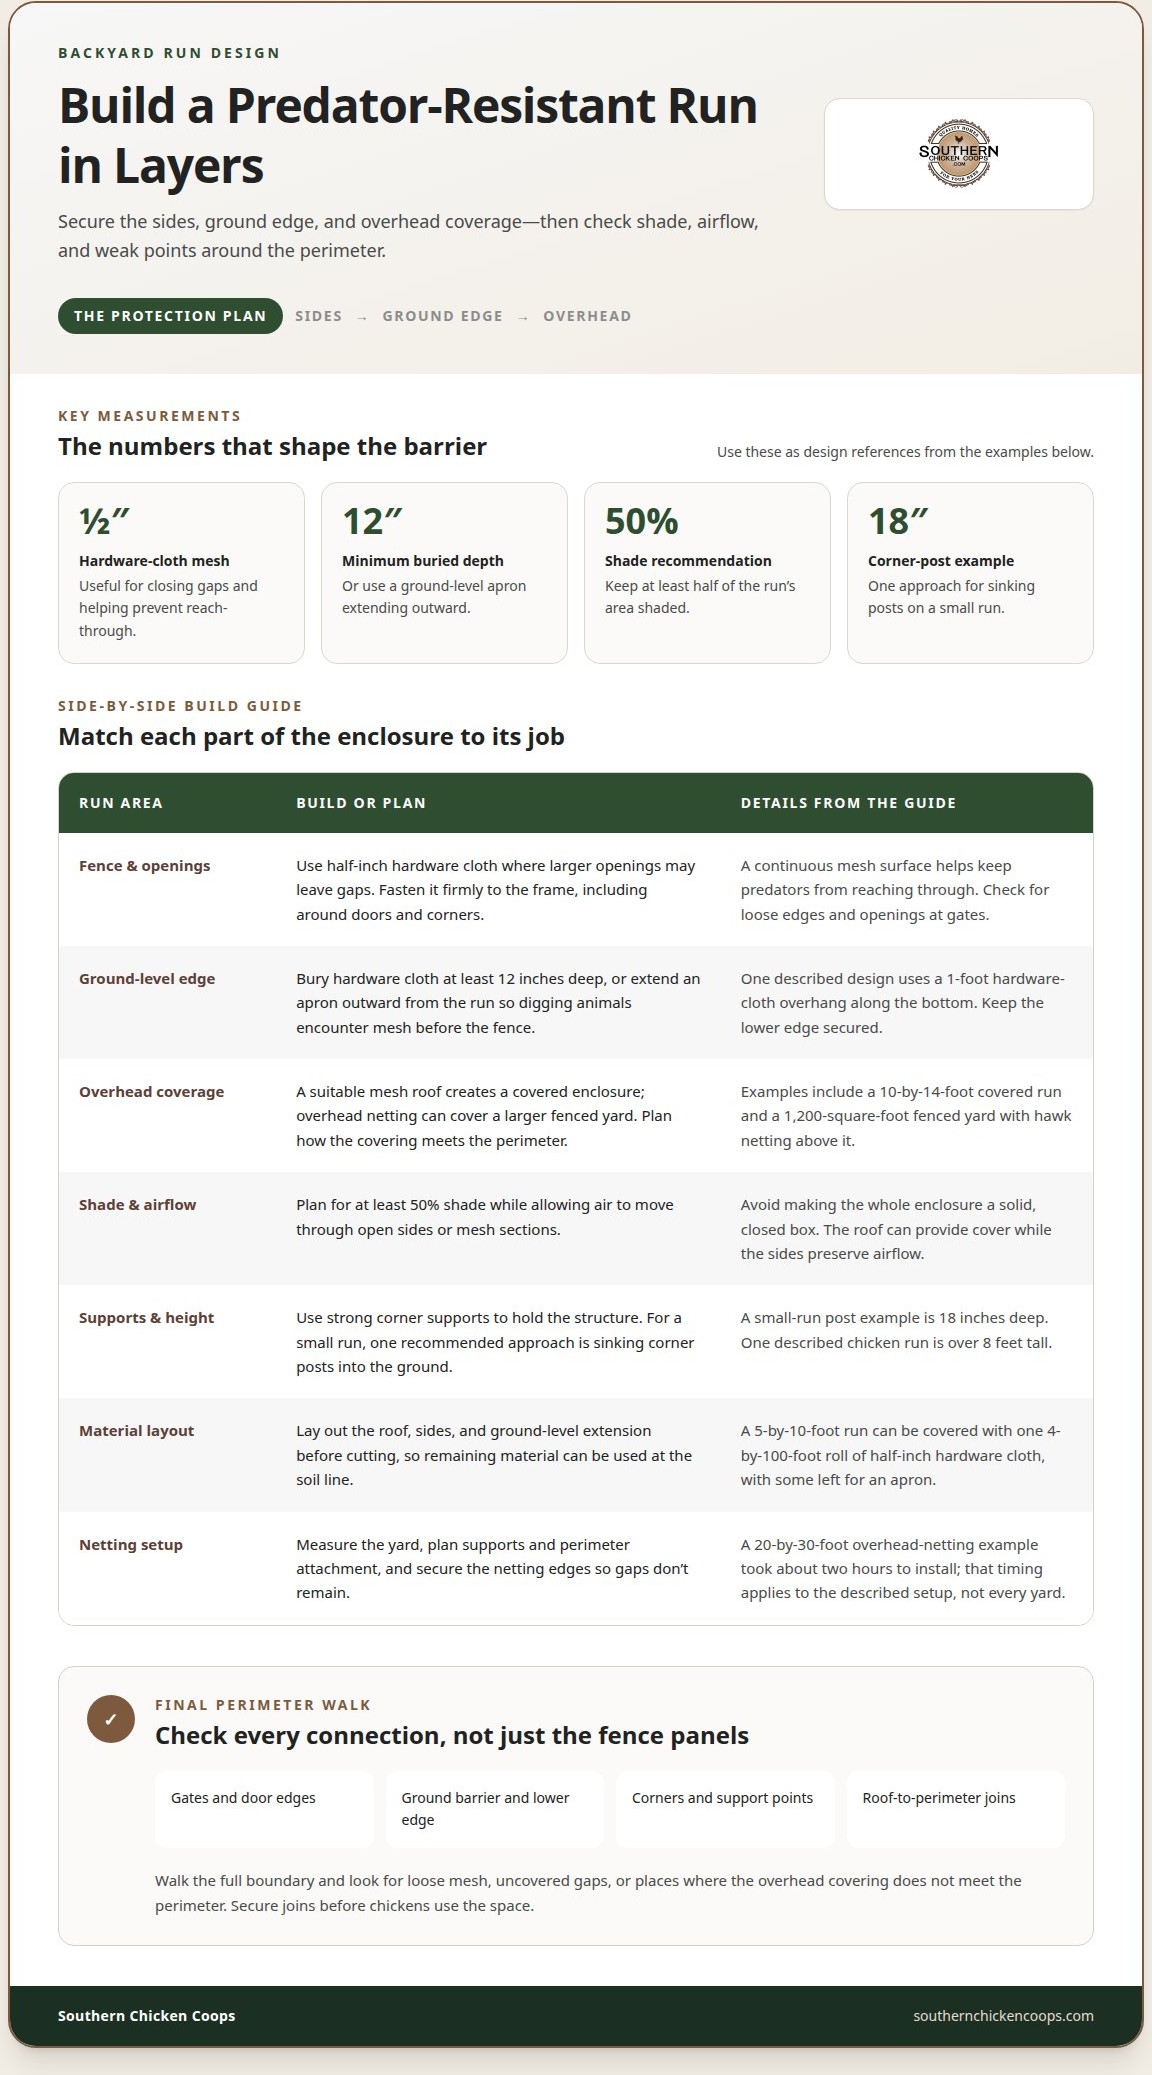
Begin with the run’s vulnerable edges: its fence, roof, and ground-level boundary. Half-inch hardware cloth is a useful choice for closing gaps that larger openings may leave. Secure it firmly to the frame, including around doors and corners, where loose edges can undermine the barrier. A 1/2-inch mesh also forms a continuous surface that helps keep predators from reaching through the enclosure.
Digging predators need a barrier at the base, not just strong sides. Bury hardware cloth at least 12 inches deep, or create a ground-level apron that extends outward from the run. An apron makes digging animals encounter mesh before they reach the fence. One described design uses a 1-foot hardware-cloth overhang along the bottom. Whichever layout you choose, keep the lower edge secured and close openings at gates.
Cover the run overhead when protection from climbing or aerial predators is part of your plan. A roof made from suitable mesh offers a solid enclosure, while overhead netting can cover a larger fenced yard. For example, one covered run measures 10 by 14 feet. Another keeper’s chickens use a 1,200-square-foot fenced yard with hawk netting above it. These examples show how coverage can fit either a compact run or a wider space.
For an open fenced yard, measure the area before choosing netting. A 20-by-30-foot overhead-netting example took about two hours to install. That time applies to the described setup, not every yard; layout and supports affect the work. Plan how netting will meet the perimeter, and secure its edges so gaps don’t remain around the boundary. Strong corner supports help hold the structure in place.
Shade and airflow belong in the same plan. A run should keep at least 50% of its area shaded, according to the provided recommendation. For ventilation, use open sides or mesh sections that let air move through while maintaining the predator barrier. Avoid turning the whole enclosure into a solid, closed box; the roof can provide cover while the sides preserve airflow.
Before settling on a design, walk the perimeter and look for weak points. Check each gate, the ground-level edge, corners, and the roof connection. For a small run, sinking corner posts 18 inches into the ground is one recommended approach. A layered design, secure mesh, a buried barrier or apron, and overhead coverage can work together to make a backyard enclosure more resistant to predators.
Material planning can help keep the barrier continuous. A 5-by-10-foot run can be covered with one 4 by 100-foot roll of half-inch hardware cloth, with some left over for an apron. Lay out the roof, sides, and ground-level extension before cutting, so the remaining material can be used where the enclosure meets the soil. Fit each section tightly against the frame and check the joins for openings.
Height is another design detail to consider: one chicken run described in the thread is over 8 feet tall. The example overhead-netting area measures 20 by 30 feet and takes about two hours to install. Treat that as an example rather than a fixed estimate, and plan the supports and perimeter attachment for the shape of the yard. A final inspection can identify loose edges or uncovered gaps before chickens use the space.
2. Sand run flooring, drainage, and dust bathing
For hot Texas summers, choose a run with open sides, good airflow, shaded resting places, and a dry floor. Coarse sand can provide a loose surface for scratching and dust bathing, while airflow helps keep the enclosure from feeling stagnant. Among chicken run ideas for Texas backyards, sand flooring works best when the yard drains well and the surface is manageable to clean. Place the run where rainwater flows away instead of collecting beneath it.
Coarse construction sand is one possible run base. A recommended layer is 4 to 6 inches deep; a 5-by-10-foot run takes about one cubic yard at that depth. Before spreading sand, observe how water crosses the yard after rain. A low spot may retain moisture under the surface. Choose better-drained ground or plan how runoff will move away from the enclosure.
Sand also gives hens a loose area for dust bathing. Keep a designated spot accessible, then rake or refresh the floor as droppings and damp patches build up. One keeper uses multipurpose sand, scoops it daily, and composts the collected droppings. That’s a practical example, but cleaning needs depend on how quickly the run gets soiled. Chicken run ideas for Texas backyards should account for both the surface and its upkeep.
For Texas storms, high winds, and flooding, place the run where runoff won’t pool, and direct water away from its edges. A raised or well-drained base can help prevent bedding from sitting in puddles. Secure the flooring and enclosure as one system, since loose materials can shift when wind or moving water reaches the run. After heavy rain, check for standing water, washed-out ground, and displaced covering.
Concrete is another possible base, but it still needs a covering. One recommendation is a 4-to-6-inch layer of sand or wood chips over concrete. Droppings and moisture collect on this layer, so plan to remove soiled material and replenish the surface as needed. Choose sand, chips, or soil by considering drainage, cleanup, dust-bathing space, and the ground conditions around your Texas run.
Include the coop’s placement in the plan. Its position affects shade, airflow, and where rainwater travels around the run. A well-drained site with open airflow can make the enclosure more practical through hot weather and wet spells. Before choosing the floor, consider how hens use the space, how you’ll clean it, and whether the surface will stay dry enough for dust bathing. These details help make daily care manageable.
3. Chicken tunnels connecting runs and gardens
A chicken tunnel creates a managed route between a coop, a run, and selected garden space. Plan the route before placing beds or gates, then mark where each end will connect. A direct path lets hens forage without roaming the whole yard and keeps their access focused on areas you’re prepared to share with them.
For space planning, allow at least 10 square feet of outdoor run space per bird. That gives four hens a minimum of 40 square feet, such as a 5-by-8-foot or 5-by-10-foot run. Treat a tunnel as a connecting route, not as a substitute for the flock’s main outdoor area. Consider how much usable space remains when hens are inside the run.
Build the route to follow the yard’s contours, with bends only where the layout requires them. Keep the passage clear of garden tools, low branches, and anything that could obstruct movement. Secure both ends, and make gates easy to close when hens need to stay in the run. A tunnel should maintain a continuous barrier, not leave an open gap between enclosures.
Choose the garden destination carefully. Hens can scratch soil and forage among plants, so a tunnel lets you control where that activity happens. For example, connect the run to an area that can tolerate scratching instead of routing hens directly through delicate beds. A separate garden boundary can keep birds away from crops you want to protect.
Permit, setback, and HOA requirements vary by city and property. Before fixing the tunnel route, review local rules that may apply to backyard poultry structures and where they can be placed. This is especially important if the route approaches a fence, neighboring property, or shared boundary. Plan around those constraints before building the tunnel.
There’s no single build cost for a Texas chicken tunnel. The total depends on its length, framing and covering materials, gates, ground preparation, and connection to an existing run. A short route joining two nearby enclosures uses different materials than a longer path across the yard. Those design choices determine the overall cost.
Before construction, walk the route from the run to the garden and note each turn, gate, and connection point. Make sure the tunnel remains accessible for cleaning and daily flock care. If the garden layout changes, a well-planned route can still guide hens to a new foraging area without giving them access to the entire backyard.
4. Electric poultry netting
Electric poultry netting can define a temporary outdoor area without fixing every boundary in place. It suits keepers who want to shift access as grass gets worn or forage changes. One example creates a daytime chicken area measuring 50 by 30 feet. That larger layout shows how movable netting can organize yard space, while a smaller enclosure can follow the same basic approach.
Start by choosing a level route that forms a complete perimeter. Place posts every 4 feet along the run, as recommended for this setup. Keep the netting line clear of branches, garden equipment, and other obstacles that could interrupt its placement. At corners, follow the netting’s shape without leaving an open passage. A continuous boundary makes the intended chicken area easier to manage.
Plan the entrance before setting the posts. A gate or opening needs to close neatly against the netting, so hens don’t wander out through a gap. Position the entrance where you can reach it from the coop or regular yard path. For example, a 50-by-30-foot daytime area works best when its access point fits the keeper’s daily routine, not just the yard’s shape.
Electric netting can support rotation, but it isn’t a roof. Chickens in an open pen remain exposed from above, so overhead protection may be needed where aerial predators are a concern. Netting also doesn’t automatically prevent predators from digging beneath the boundary. Add suitable ground-level protection when digging predators are a risk. Each layer serves a different purpose.
Before moving the enclosure, decide where the next area will be. Look for suitable ground, room to close the new perimeter, and a route that avoids garden beds you want to preserve. After relocating it, walk the full edge and check that every post is aligned and each connection closes. Regularly inspect for sagging, displaced posts, or vegetation pressing against the netting.
Texas backyards vary in shape, so the practical advantage is adaptability rather than one standard footprint. A long, narrow section may suit a fence line, while a broad lawn can accommodate a larger daytime pen. Keep the coop accessible, leave a clear path for care, and avoid placing the boundary where runoff or yard activity regularly disrupts it. Electric poultry netting is flexible, but thoughtful placement and regular inspection make that flexibility useful.
Where overhead cover is needed, plan it as a separate layer from the movable perimeter. An example overhead-netting area measures 20 by 30 feet and takes about two hours to install. Consider how that cover will align with the enclosure and how you will reach the birds and care for the space before settling on its position.
Make sure the overhead arrangement works with the access point and your routine for moving the ground boundary. After installation, check that the covered area and enclosure meet as intended, and review the setup if you relocate the pen. This keeps overhead protection in the plan without treating it as a substitute for a complete, well-maintained perimeter.
5. Portable chicken tractor designs
A practical DIY starting point is a portable frame built around a pallet platform and raised rail. Reusing sound materials may reduce new purchases, while the design still needs a secure enclosure and easy movement. A classic example is a 4-by-8-foot A-frame tractor. Its compact footprint can suit a backyard where a fixed run would take too much space.
Plan the tractor around the ground it must cover and your flock’s routine. The frame needs room for hens to move, a sheltered section, and a way to reach inside. A raised rail adds vertical space to a pallet platform without making the footprint wider. Keep the shape balanced, since an awkward frame can be harder to move across uneven grass.
Daily movement is one way to give chickens fresh ground. In a described 40-by-50-foot yard rotation, moving a tractor one tractor-length each day gives grass three to four weeks to recover. Another approach alternates between two grass areas every two to four weeks. The right pattern depends on the yard’s layout and how quickly the ground gets worn.
Make movement a deliberate step. Clear the next spot, check that the path is free of obstacles, then lift the handle about 6 inches before rolling the tractor forward. That small lift helps the frame pass over the ground rather than dragging its edge. After moving it, settle the enclosure and check its perimeter before leaving the hens inside.
A 40-by-50-foot rotation example includes about 20 tractor positions. That gives a useful picture of how repeated moves can distribute access across a lawn. Marking the next resting area can help prevent missed patches and excessive wear. Watch the grass and soil as you go; shorten the rotation when ground becomes bare, or allow more recovery time where growth is slow.
For an affordable DIY approach, start with a usable pallet platform and raised rail, then adapt the footprint to your yard. Reclaimed materials can help limit purchases, but sound construction and predator protection still matter. The 4-by-8-foot A-frame is a reference design, not a required size. Keep the finished tractor manageable for the person who moves it.
A portable tractor works best as part of a broader setup, rather than as an automatic replacement for secure overnight housing. If your plan pairs movable daytime access with a permanent coop, explore custom chicken coops to shape the housing around your backyard needs. The clear takeaway: design for safe containment, simple movement, and enough recovery time for each patch of grass.
Southern Chicken Coops
Southern Chicken Coops can help you choose chicken housing that fits the backyard setup you’ve planned. Its custom chicken coops are tailored to individual needs, making them a practical next step when you’re weighing a permanent coop alongside garden tunnels, netting, or a portable tractor. The signature Polka model measures 6-by-12 feet and is designed for durability and functionality in the Texas climate. Coop delivery is also available.
Think about where the coop will sit in your yard and how it will connect with your preferred run arrangement. A thoughtfully chosen coop gives your flock a dependable home base while you plan outdoor access around your space and routine. Southern Chicken Coops builds custom chicken coops for Texas backyards. Contact the team to discuss a coop that fits your setup.
Make Your Backyard Plan Your Own
The right setup fits your flock, your yard, and the way you care for your chickens. Before making changes, picture an ordinary day: where the hens will move, how you’ll reach them, and which parts of the yard need protection. That practical vision can turn chicken run ideas for Texas backyards into a manageable plan, not an overcomplicated one.
You don’t have to settle every detail at once. Start with the layout that best fits your space, then consider how a dependable coop can anchor the arrangement as your needs evolve. Southern Chicken Coops builds custom chicken coops and delivers completed coops to prepared, level lots. Contact the team to discuss your backyard setup.
Contact Southern Chicken Coops today to discuss your backyard plans. A thoughtful beginning can help you build a secure, useful space for your flock, one decision at a time.
Frequently Asked Questions
What fencing and predator-proofing protect chickens from snakes, coyotes, hawks, and raccoons?
Use 1/2-inch hardware cloth for the enclosure, close gaps around doors, and protect the perimeter from digging. Coyotes may test the base, raccoons can climb, and snakes can slip through openings, so check seams and gates as carefully as the main fence. Add overhead coverage where hawks are a concern. No single barrier addresses every route, so combine secure sides, a protected base, and a covered top.
What are the best ground coverings and drainage solutions for chicken runs in Texas?
Coarse sand and wood chips are practical ground-cover options, and the best choice depends on your yard’s drainage and cleaning routine. In a low area, first consider where rainwater flows and how it can drain away from the run. Check the surface after storms for puddles or washed-out spots, then remove wet, soiled material. A dry dust-bathing area gives hens a useful place to scratch without relying on the entire run staying dry.


